Resize Boot Camp partition on macOS Monterey with APFS without reformatting

In short, I needed to grant about 100 GB of extra space to my Bootcamp Windows partition from my Mac partition, without erasing and reinstalling Windows, on macOS 12.6 Monterey running on a 2019 Intel MacBook Pro. There is a lot of conflicting or outdated information about this procedure, including some which assert that it was impossible. It is possible, and actually, quite straightforward to resize the Boot Camp partition on macOS 12.6, even with an encrypted AFPS system volume, with minimal third party tools.

These are notes that I took to ensure that I can replicate the procedure next time.

DISCLAIMER: this is what worked for me, on my EFI-based MacBook Pro. There is no guarantee this works for other models of MacBooks or OS versions. Changing disk partitions across two operating systems always has the risk of seriously damaging partition maps and rendering data irretrievable. I am not responsible for any damage that may result if anyone follows my notes. Sorry, but again, this is what worked for me, and is no guarantee that it would work for anyone else. Keep full backups via Winclone and Time Machine in case something goes wrong!

General concept

  1. Add a new partition (note: not a new APFS volume, but a new partition / APFS container) with a slightly larger size than the desired amount of space to be added to Boot Camp, via Disk Utility, which will losslessly shrink the AFPS macOS container to do so. This partition should exist adjacent to the Windows partition.
  2. Delete the partition in macOS and leave unformatted free space in its place
  3. Reboot into Boot Camp and use a Windows partition manager to claim most of the free unformatted space
  4. Re-absorb the remaining free space back into the main APFS container

Step 1: Create a new partition

On a standard Boot Camp setup, there are three major partitions — the first is the APFS container containing all the Mac volumes, the second is the Windows NTFS partition, and the third is the Windows recovery partition.

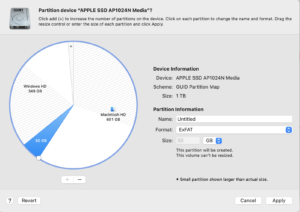
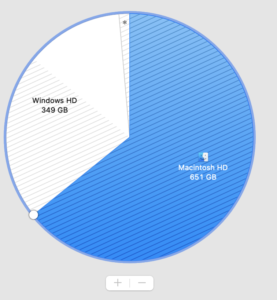
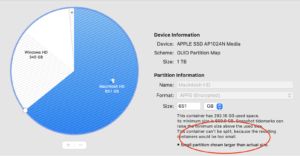
The first step is to add a new partition, right in front of the Window partition. Disk Utility in macOS can do this losslessly, by shrinking the primary APFS container. In Disk Utility, select the Apple SSD physical disk, and click the Partition button at the top of the tool bar to open the pie chart, and Click the + button to add a partition.

“Container can’t be split” error

In trying to add the partition, however, Disk Utility may report that “This container can’t be split, because the resulting containers would be too small.” In this case, the + (plus) or – (minus) buttons to add and remove partitions in Disk Utility will be grayed out.

This rather obtuse error actually means that the Time Machine snapshots on the primary macOS partition need to be deleted. I believe this is because macOS is using the supposed “free” space on the disk to store local Time Machine snapshots, and thus the “free space” in the container is not actually free. To be able to shrink the container, these snapshots need to be removed first in order to truly free up the space for shrinking.

Removing snapshots

First, turn off Time Machine automatic backups.

Then, in terminal, issue this command:

tmutil deletelocalsnapshots /

This should show a list of deleted snapshots. Verify the snapshots have been destroyed

tmutil listlocalsnapshots /

This should output no snapshots.

try to split the partition again

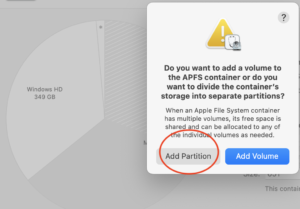
Quit the Disk Utility app if it was previously open. Wait a couple of minutes after the snapshot deletions — sometimes it seems to take Disk Utility a bit to re-detect available space. Re-open Disk Utility and try the Partition tool bar button again. This time the + button should be enabled, and it should ask whether it should create a partition or a volume. Choose the Add Partition option.

Choose a size that is slightly (by 1 GB or so) larger than the desired space to be added to Boot Camp Windows. In theory, this additional buffer space isn’t strictly necessary, but I ran into an issue in Step 3, that I had to resolve by absorbing less than the full unformatted space. Any filesystem should be ok, as we will be deleting this partition shortly afterwards anyway.

When the Apply button is clicked, Disk Utility should shrink the primary APFS container, create the new partition of the demanded size, and format it, all without damaging any data on the original Macintosh HD volume — even if it was FileVault encrypted, as mine was.

Note that it is important that this newly created partition is situated immediately adjacent and contiguous to the main Boot Camp partition. The entire resizing strategy will not work otherwise.

Step 2: Delete the partition but leave free unformatted space behind

First, in Terminal, run

diskutil list

This should produce a list of physical disks and their partitions/slices. Look for the new partition identifier that was just created in step 1. Obviously this identifier will be different depending on the specific disk layout, number of disks, slices, etc. Also, needlessly to say, be very careful in finding the correct identifier for the partition. Erasing the wrong partition will be quite unfortunate.

In my case, disk0s2 was the main macOS APFS partition, disk0s3 was the main Boot Camp partition (type was “Microsoft Basic Data”), and disk0s7 was the newly created partition from step 1. Again, YMMV.

At this point, run
diskutil eraseVolume free none identifier

where [identifier] was disk0s7. This will delete the partition and leave the space as unformatted free space. Verify this happened sucesssfully using another diskutil list.

Step 3: Use a Windows partition manager to claim free space

At this point, reboot into Boot Camp / Windows and find a partition manager. I used MiniTool Partition Wizard Free edition.

If a filesystem repair hasn’t been done in a while, use Windows’s chkdsk to scan and repair any damage to the filesystem first.

Using Partition Wizard, right click on the main Boot Camp partition C: and choose the Resize Partition option (note: not the Extend option, which did not work for me). In the subsequent panel, use the slider to expand the partition into the unformatted free space. Do not resize into all of the free space, but leave ~1 GB buffer as free space between the Mac and Windows partitions. In my attempts, taking all of the available free space caused Partition Wizard to throw some strange Error Code 19 and Error Code 24 when it tries to resize the partition, where as leaving a buffer did not cause this issue.

Click Apply and allow Partition Wizard to reboot the machine. On next boot up, it should attempt to run a resize operation, which may take 5 to 10 minutes. If it fails with some kind of filesystem error, use Partition Wizard to schedule another disk repair and try the resize again.

Step 4: Re-absorb the remaining free space back into main APFS

Reboot back into macOS. Using these notes, there would about ~1 GB of buffer space remaining between the macOS APFS container partition and the newly expanded Windows partition. This unformatted free space should be re-absorbed back into APFS via the command:

diskutil apfs resizeContainer disk0s2 0

where disk0s2 should be changed to the disk partition identifier for the main APFS container.

At this point, the procedure is complete and the Boot Camp partition should have been successfully expanded without having been erased/reformatted/reinstalled.
check progress of photoanalysisd

If you’ve just installed Mac OS Sierra and now see photoanalysisd sucking 100% to 200% CPU power, this process is doing some kind of face detection + object / image recognition / indexing on your Photos library.

photoanalysisd progress

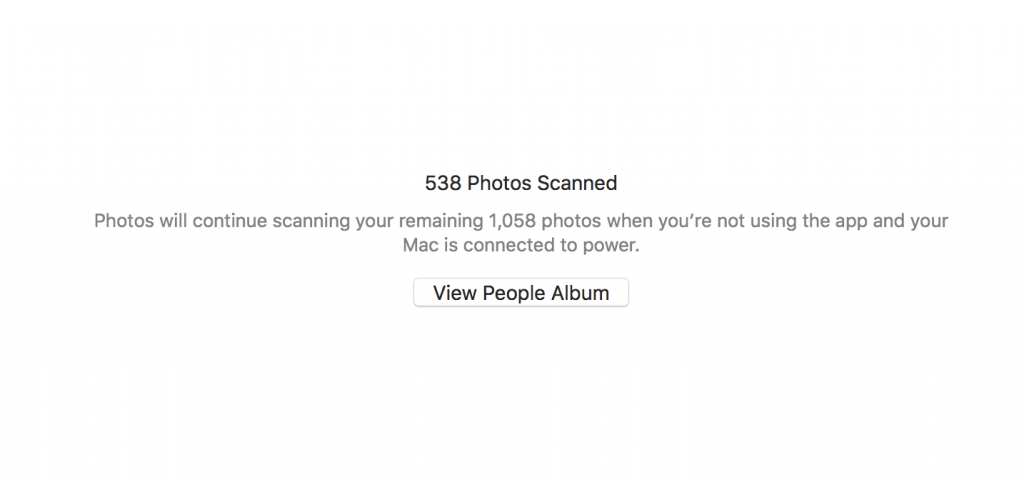
Open Photos.app, select People on the left sidebar, and see how far it’s gotten in this task. If you have a very large Photos library, this might take a while.

As a bonus, while Photos.app is open, photoanalysisd is suspended, allowing your laptop fans a bit of a rest.

It’s all for a good cause. After indexing, you’d be able to type “ocean” in the search box and get all your photos with the ocean in it, without having to tediously tag all your photos yourself. Magical, huh? ( Not really. If this is doing what I think it’s doing, well, it’s the kind of problem computer vision researchers have been tackling – and solving – for years already.).

As an aside, for consumer-grade apps like Photos, arguments have been made to do computationally intensive image analysis in The Cloud(tm) instead of on client machines. The tradeoff is fairly obvious. In exchange for the privacy benefit of Apple not uploading color histograms of all your photos to its own cloud servers (something I’m sure Google wouldn’t bat an eyelash at doing), you’ll have to pay the cost of doing this analysis yourself, with your own measly consumer/mobile-grade CPUs (which isn’t ideal if you want to get work done at the same time that this analysis is going on). Overall, the user experience probably could have been handled better, especially given the extensive public beta period that Sierra received. The current opaque process violates some core UX principles: giving users (at least the feeling of) control, and giving the user clear reasons to trust in the importance of the task being performed. Apple should have known that eating 100% CPU while people are actively working with their machines is immediately noticeable, and should have 1) let the user know that image analysis is about to happen, and 2) given them the option of choosing when and how much CPU to devote to this task.

restoring Safari preferences from backup files in OS X Mavericks

Recently I had the misfortune of having to restore some Safari settings from backup, on OS X 10.9 Mavericks. I have done this many times before on older OS X versions, without incident — simply pull the various preference files such as com.apple.Safari.plist from backup and replace the damaged/unwanted ones. Takes all of 2 minutes, and years ago, I had already wrote a shell script to do exactly that.

It turns out that after Mavericks, Safari is incredibly resistant to conventional methods of preference file backup and restoration. Considering that preferences in OS X have always been stored in XML-based preference lists, you would think (as in previous operating systems from 10.0 to 10.7) taking the relevant preference files and replacing the unwanted new ones in ~/Library/Preferences would be enough. But no, an incredible amount of effort is now required for a simple task:

  1. unhiding the Library directory, because clearly we’re all Windows babies who cannot be trusted to see where application preferences are stored
  2. replacing the actual preference files, scattered around the system in ~/Library/Safari, ~/Library/Preferences, ~/Library/Caches, and hopefully remember to have turned off iCloud, or otherwise see changes being clobbered by iCloud sync (or, worse yet, having experimental changes reflected all across a network of Mac and iDevices)
  3. resetting the preference cache daemon, cfprefsd so that preference changes can be reflected in a running system. This where a lot of people get stuck in general, judging by Google results; when they replace preference files and find that their changes aren’t being reflected, it leads them into a wild goose chase for “hidden preference files” for Safari, when the answer lies in a simply yet utterly non-obvious background daemon.
  4. restoring the list of installed extensions — which, incredibly, is NOT stored in the deceptively named com.apple.Safari.Extensions.plist, but in the login.keychain.

Context

Had some issues where certain websites were behaving differently under private browsing mode than normal browsing mode. I deduced there was some kind of corrupted stored state, whether it was a cookie or localstorage issue. Had the brilliant idea of setting Safari preferences aside, thus resetting Safari to factory state, and then divide-and-conquer by restoring parts of the settings until the problem recurs. I’ve done this many times before.

First I turned off iCloud sync, having been bitten by sync propagation of experimental changes in the past. This is pretty important if you don’t want to blow up Safari bookmarks (at the very least) across all Apple-manufactured, iCloud-compatible devices. I then removed ~/Library/com.apple.Safari.plist, ~/Library/com.apple.Safari.Extensions.plist, ~/Library/Safari, and ~/Library/Caches/Safari, ~/Library/Cookies. After resetting to confirm some issues have disappeared, I moved some files from backup to original locations. Imagine my surprise when nothing became restored, and all my Safari extensions (installed from the extension store or custom-built by me) disappeared.

Process

Increasingly desperate, I started to trace filesystem accesses using fs_usage. It showed nothing out of the ordinary. 30 mins of reviewing useless forum posts later, I pieced together a multi-stage solution. It turns out there were two separate obstacles.

Preference caching

Presumably to save energy, OS X Mavericks caches application preferences (in RAM?) using a daemon called cfprefsd. Instead of applications pulling their preferences from XML files on disk at launch, it requests this from the daemon instead. The defaults command has been modified to operate with this daemon, so if you had been working with preferences from the command line (as I have been), the changes have been transparent.

However if the preference files are changed or edited directly, this change is not propagated to the preference cache daemon. When the app is opened again, the cached version takes precedence, and is re-written out to disk, clobbering the restored versions.

This does not mean there are hidden Safari preferences somewhere that you haven’t found, though you might think this at first. When Safari is reset manually from the filesystem, or if the plist files are edited, cfprefsd must be reset as well.

There exists a cfprefsd daemon for every logged in user, running under that user’s privileges, as well as a root-owned one. Safari preferences are stored under the user domain, so the user-specific daemon is the one that needs a reset when files change. Can also quit the process from Activity Viewer, or killall cfprefsd. A login-logout cycle would also reset the user-specific daemon.

Extension list caching

Having done this reset with the backup files in place, most preferences will be restored on next launch, *except* the list of extensions you had installed previously. That will remain empty. Even though all the extensions and their settings have been restored to ~/Library/Safari.

For a long time I traced ~/Library/com.apple.Safari.Extensions.plist, and wondered why it wasn’t being read.

An Apple discussion forum post (shockingly enough) gave a vital clue. There exists an “application password” in the login keychain titled “Safari Extensions List”. Whether it is merely a cryptographic key, or the actual list of extensions, is unknown, but that is the critical preference to restore extensions. Having reset extensions by moving them away, this preference is apparently emptied out. The entire login keychain, being an encrypted document, has to be restored to a corresponding previous version to restore access to previous extensions. Without this, all extensions would have to be reinstalled manually (and get a new copy of the extension file stored into ~/Library/Safari/Extensions, instead of the previous version being reused).

Discussion

Given recent focus on energy consumption, I can understand preference caching. However, it’s not that hard to track filesystem changes (the Time Machine/Spotlight APIs explicitly do this!) and reload appropriate preferences when they are changed on disk. It would show respect for power users and developers who might need to interact with the preferences system in a more convenient way.

But stuffing extension lists in an obscure corner of a password keychain? What sense does that make? Are my list of extensions (not actual extension data or settings, mind you — those are in plaintext on the disk for anyone to copy and look at) such privileged information that it has to reside alongside my login password? Why can’t you just read the list of extensions, oh I don’t know, from the list of extension files installed into the Extensions directory? Wouldn’t that be a lot more reasonable?

building a dynamic library on OS X

[UPDATE: 02/26/2010
As of Xcode 3.x, the -shared argument seems to be working on OS X to create shared objects. the -dynamiclib switch still works for creating dylibs. This post is left for historical curiosity.]


Some free software packages have an optional make target to build shared libraries out of their core application functions. Unfortunately, some of these packages are set up to compile for typical Linux shared objects. For example:

gcc -shared -Wl,-soname,libfoo.so.1 -o libfoo.so.1 $(OBJ)

where $(OBJ) is your set of object files.

On Apple’s GCC (for Tiger and Leopard, at least), there is no -shared switch, and no -soname switch either. Compilation will fail at this step. The incantation to build a shared object would translate to something like:

gcc -dynamiclib -Wl,-headerpad_max_install_names,-undefined,dynamic_lookup,-compatibility_version,1.0,-current_version,1.0,-install_name,/usr/local/lib/libfoo.1.dylib -o libfoo.1.dylib $(OBJ)

headerpad_max_install_names will allow you to change the install path with install_name_tool later, should the install_name change during the life of the compiled object.

You must also ensure that your object files are compiled correctly for shared library usage. Usually this means compiling with -fPIC and -fno-common, depending on your code.

I’ve had to do this infrequently, which means I forget the syntax the next time and have to google for it again. Too many “cache-misses”, so to speak.

A NAT-PMP client library for Python

Something that I’ve put together and might be somewhat useful to others. I wrote a NAT-PMP (Network Address Translation Port Mapping Protocol) library and testing client in Python. The client allows you to set up dynamic port mappings on NAT-PMP compatible routers. Thus this is a means for dynamic NAT traversal with routers that talk NAT-PMP. In practical terms, this is basically limited to the newer Apple AirPort base stations and the AirPort Express, which have support for this protocol. I’m currently unable to support UPnP (the dominant port mapping protocol in non-Apple routers), though I’m sure either someone has written bindings for Python, or I’ll have to do it eventually once my AirPort Express dies.

In any case, this library puts a thin layer of Python abstraction over the NAT-PMP protocol, version 0, as specified by the NAT-PMP draft standard.  The purpose of this is simple.  I needed to establish port forwarding without rebooting my AirPort router.

Normally, when you need to have a public port on your router forwarded to a private port on your box behind it (say, if you write a server that listens on a port, or have a P2P client running on a port) you’d have to fire up AirPort Utility.app -> Advanced -> Port Mappings, set your mappings, and then hit Update…which reboots the router, killing your network connection and anything you might be doing. There has been no good way to do this programmatically with AirPort routers, when your program needs to negotiate a port forwarding with no manual intervention. Further, there isn’t a command-line tool to open up a port when you’re SSH’ed into your machine but don’t have a GUI.

Creating the port mappings dynamically via NAT-PMP allows port forwarding to happen without the reboot. When my server runs, it can make a call to the router to start forwarding a port.  Furthermore, when I’m done with testing my server, I stop renewing the port mapping, and it expires when its lifetime runs out.  Thus, I won’t forget to delete the mapping later (and reboot the router yet again) when I want that port secured behind the NAT.

Files

py-natpmp repository on Github. If you want the unpackaged source code, you can find the latest versions there.

py-natpmp-0.2.1.tar.gz – a proper Python setuptools package for py-natpmp, if you’re rather take a tarball.

(To enable NAT-PMP on the AirPort router, go to AirPort Utility.app -> Internet -> NAT -> Enable NAT Port Mapping Protocol. Requires Mac OS X 10.4 to succeed. Older AirPort utility software may have this option hidden elsewhere.)

The code is BSD licensed, so feel free to take it. I’d love knowing where this code ends up (just out of personal curiosity), if you drop me a line, but that’s quite optional.

Client

To use the client, grab it and the above library. Make sure you have the library in the same directory as the client script or otherwise on your Python instance’s sys.path. Invoke the client on the command-line (Terminal.app) as python natpmp-client.py [-u] [-l lifetime] [-g gateway_addr] public_port private_port.

For example:

python natpmp-client.py -u -l 1800 60009 60009
Create a mapping for the public UDP port 60009 to the private UDP port 60009 for 1,800 seconds (30 minutes)
python natpmp-client.py 60010 60010
Create a mapping for the public TCP port 60010 to the private TCP port 60010
python natpmp-client.py -g 10.0.1.1 60011 60022
Explicitly instruct the gateway router 10.0.1.1 to create the TCP mapping from 60010 to 60022

Remember to turn off your firewall for those ports that you map.

Library

The library provides a set of high-level and low-level functions to interact via the NAT-PMP protocol. The functions map_port and get_public_address provide the two high-level functions offered by NAT-PMP. Responses are stored as Python objects.

The code is fairly well-documented, so consult the NATPMP.py file for usage details.

Disclaimer

This is an incomplete implementation of the specification.  When the router reboots, all dynamic mappings are lost.  The specification provides for notification packets to be sent by the router to each client when this happens.  There is no support in this library and client to monitor for such notifications, nor does it implement a daemon process to do so.  The specification recommends queuing requests – that is, all NAT-PMP interactions should happen serially.  This simple library does not queue requests – if you abuse it with multithreading, it will send those requests in parallel and possibly overwhelm the router.

The library will attempt to auto-detect your NAT gateway. This is done via a popen to netstat on BSDs/Darwin and ip on Linux. This is likely to fail miserably, depending on how standard the output is. In the library, a keyword argument is provided to override the default and specify your own gateway address. In the client, use the -g switch to manually specify your gateway.

Conclusion

This is a relatively simple library that I am using in aiding my development work, and provides for port forwarding and NAT traversal in my personal Python apps.  It may also come in handy for you in your Python code — if nothing else, as a reference to see how to interact with the router via the protocol. It is not elegant/well tested, and not meant for daily use by a normal user.  If you use the library in your code and it does not work for your configuration, I would be happy to take bug reports (or even better, patches!).

The client is intended for demonstration purposes only, though I personally use it as a command-line sysadmin tool for when I’m away from my machine but need to open up a port.

If you are a typical user looking for port forwarding tools, this is not for you. For an actual, well-designed, user-friendly program to perform dynamic port mappings on the Mac, try the great shareware package Lighthouse, which provides a user-friendly menu bar extra, persistent port mapping profiles, and UPnP support for your non-Apple routers.

Updated Feb 10, 2010
– Repackaged with setuptools. Fixed major bugs on systems that fail to detect the gateway automatically. Experimental Windows 7 support.
Updated Feb 05, 2008
– Removed broken mutexes, pending work to implement a decent request queue. Allow me to reiterate that this library is currently non-compliant with the specification’s recommendation to queue NAT-PMP requests. Try not to abuse your router when using this library in multithreaded Python code.
– Added some gateway autodetection on NT systems via netstat. Thanks to roee shlomo for the regex.

Again, comments and patches (or better thought-out implementations) are welcomed and encouraged.

Extracting Address Book information

If you’ve left information in the Address Book in OS X, any other program on the machine can use Cocoa APIs to extract information automatically.

#import <Foundation/Foundation.h>
#import <AddressBook/AddressBook.h>
#import <AppKit/NSWorkspace.h>

void sayHello(void)
{
   ABPerson *currUser = [[ABAddressBook sharedAddressBook] me];
   NSString *firstName = [currUser valueForProperty:kABFirstNameProperty];
   NSString *lastName = [currUser valueForProperty:kABLastNameProperty];
   [[NSWorkspace sharedWorkspace] 
                           openURL:[NSURL URLWithString:
                                                     [NSString stringWithFormat:
                                                     @"http://www.google.com/search?hl=en&q=%@+%@", 
                                                          firstName,
                                                          lastName]]];
}

int main (int argc, const char * argv[])
{
   NSAutoreleasePool *pool = [[NSAutoreleasePool alloc] init];
   sayHello();
   [pool release];
   return 0;
} 

This will take the name labelled as the currently logged in user and hit up Google, placing the first and last name in the search box and run a search with it. Other pieces of information are also accessible via the AddressBook API.

As you can well see, this can be used for many purposes: nifty automagical hacks in the OS’s built-in suite of personal information and communcation apps, for example. But I can think of less beneficial uses for this API. You should be able to trust the programs you run.