In short, I needed to grant about 100 GB of extra space to my Bootcamp Windows partition from my Mac partition, without erasing and reinstalling Windows, on macOS 12.6 Monterey running on a 2019 Intel MacBook Pro. There is a lot of conflicting or outdated information about this procedure, including some which assert that it was impossible. It is possible, and actually, quite straightforward to resize the Boot Camp partition on macOS 12.6, even with an encrypted AFPS system volume, with minimal third party tools.
These are notes that I took to ensure that I can replicate the procedure next time.
DISCLAIMER: this is what worked for me, on my EFI-based MacBook Pro. There is no guarantee this works for other models of MacBooks or OS versions. Changing disk partitions across two operating systems always has the risk of seriously damaging partition maps and rendering data irretrievable. I am not responsible for any damage that may result if anyone follows my notes. Sorry, but again, this is what worked for me, and is no guarantee that it would work for anyone else. Keep full backups via Winclone and Time Machine in case something goes wrong!
General concept
- Add a new partition (note: not a new APFS volume, but a new partition / APFS container) with a slightly larger size than the desired amount of space to be added to Boot Camp, via Disk Utility, which will losslessly shrink the AFPS macOS container to do so. This partition should exist adjacent to the Windows partition.
- Delete the partition in macOS and leave unformatted free space in its place
- Reboot into Boot Camp and use a Windows partition manager to claim most of the free unformatted space
- Re-absorb the remaining free space back into the main APFS container
Step 1: Create a new partition
On a standard Boot Camp setup, there are three major partitions — the first is the APFS container containing all the Mac volumes, the second is the Windows NTFS partition, and the third is the Windows recovery partition.
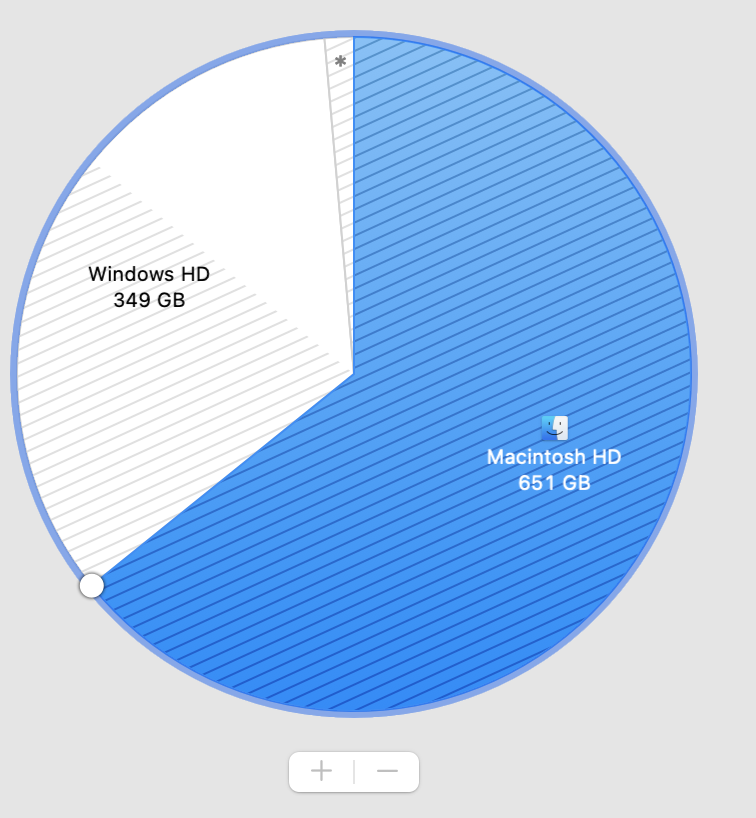
The first step is to add a new partition, right in front of the Window partition. Disk Utility in macOS can do this losslessly, by shrinking the primary APFS container. In Disk Utility, select the Apple SSD physical disk, and click the Partition button at the top of the tool bar to open the pie chart, and Click the + button to add a partition.
“Container can’t be split” error
In trying to add the partition, however, Disk Utility may report that “This container can’t be split, because the resulting containers would be too small.” In this case, the + (plus) or – (minus) buttons to add and remove partitions in Disk Utility will be grayed out.
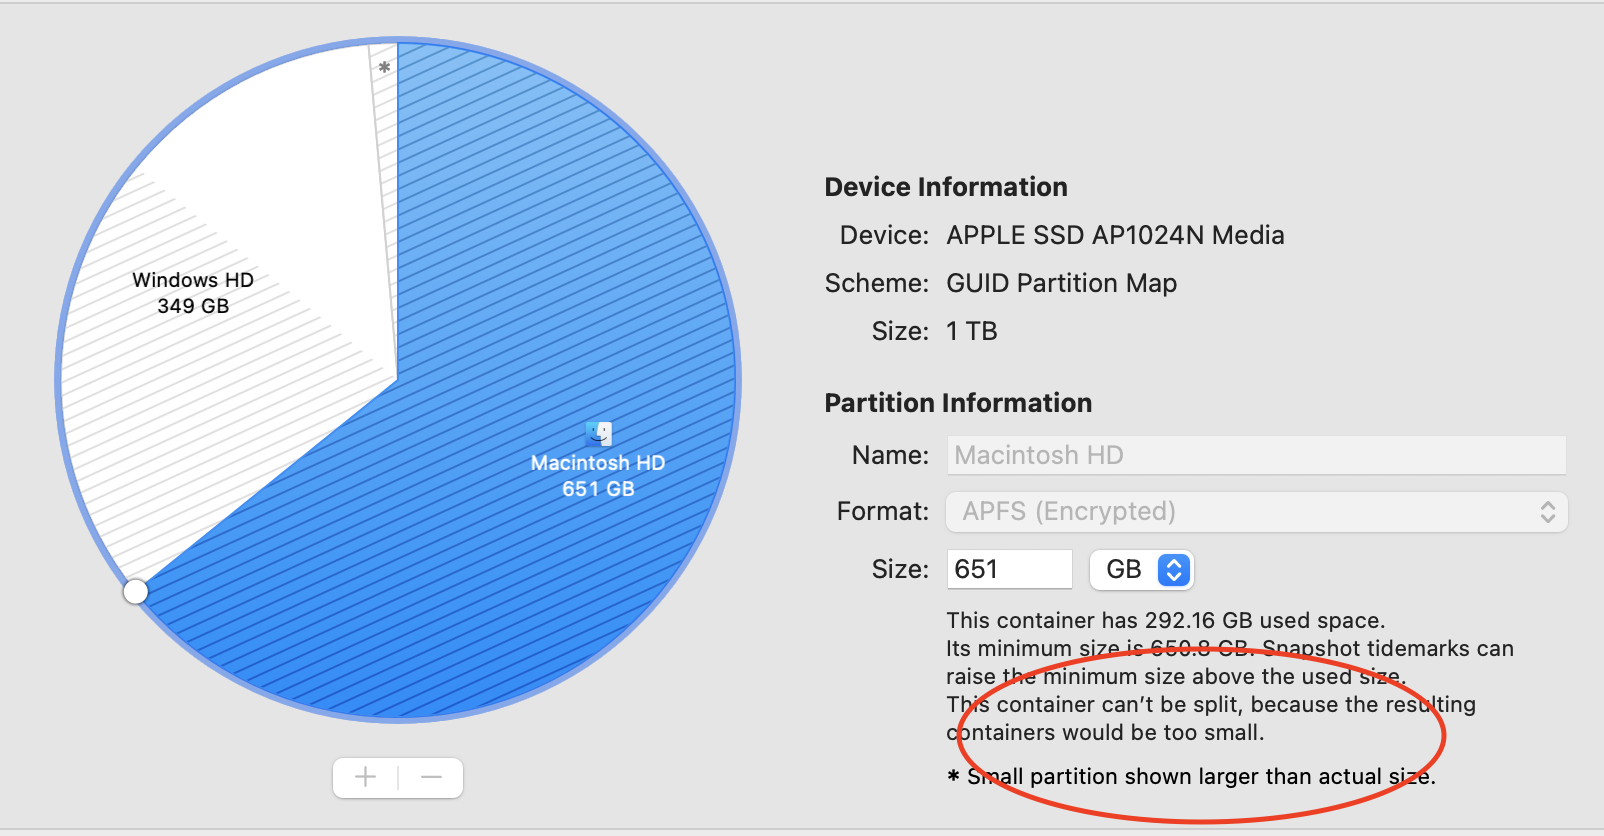
This rather obtuse error actually means that the Time Machine snapshots on the primary macOS partition need to be deleted. I believe this is because macOS is using the supposed “free” space on the disk to store local Time Machine snapshots, and thus the “free space” in the container is not actually free. To be able to shrink the container, these snapshots need to be removed first in order to truly free up the space for shrinking.
Removing snapshots
First, turn off Time Machine automatic backups.
Then, in terminal, issue this command:
tmutil deletelocalsnapshots /
This should show a list of deleted snapshots. Verify the snapshots have been destroyed
tmutil listlocalsnapshots /
This should output no snapshots.
try to split the partition again
Quit the Disk Utility app if it was previously open. Wait a couple of minutes after the snapshot deletions — sometimes it seems to take Disk Utility a bit to re-detect available space. Re-open Disk Utility and try the Partition tool bar button again. This time the + button should be enabled, and it should ask whether it should create a partition or a volume. Choose the Add Partition option.

Choose a size that is slightly (by 1 GB or so) larger than the desired space to be added to Boot Camp Windows. In theory, this additional buffer space isn’t strictly necessary, but I ran into an issue in Step 3, that I had to resolve by absorbing less than the full unformatted space. Any filesystem should be ok, as we will be deleting this partition shortly afterwards anyway.
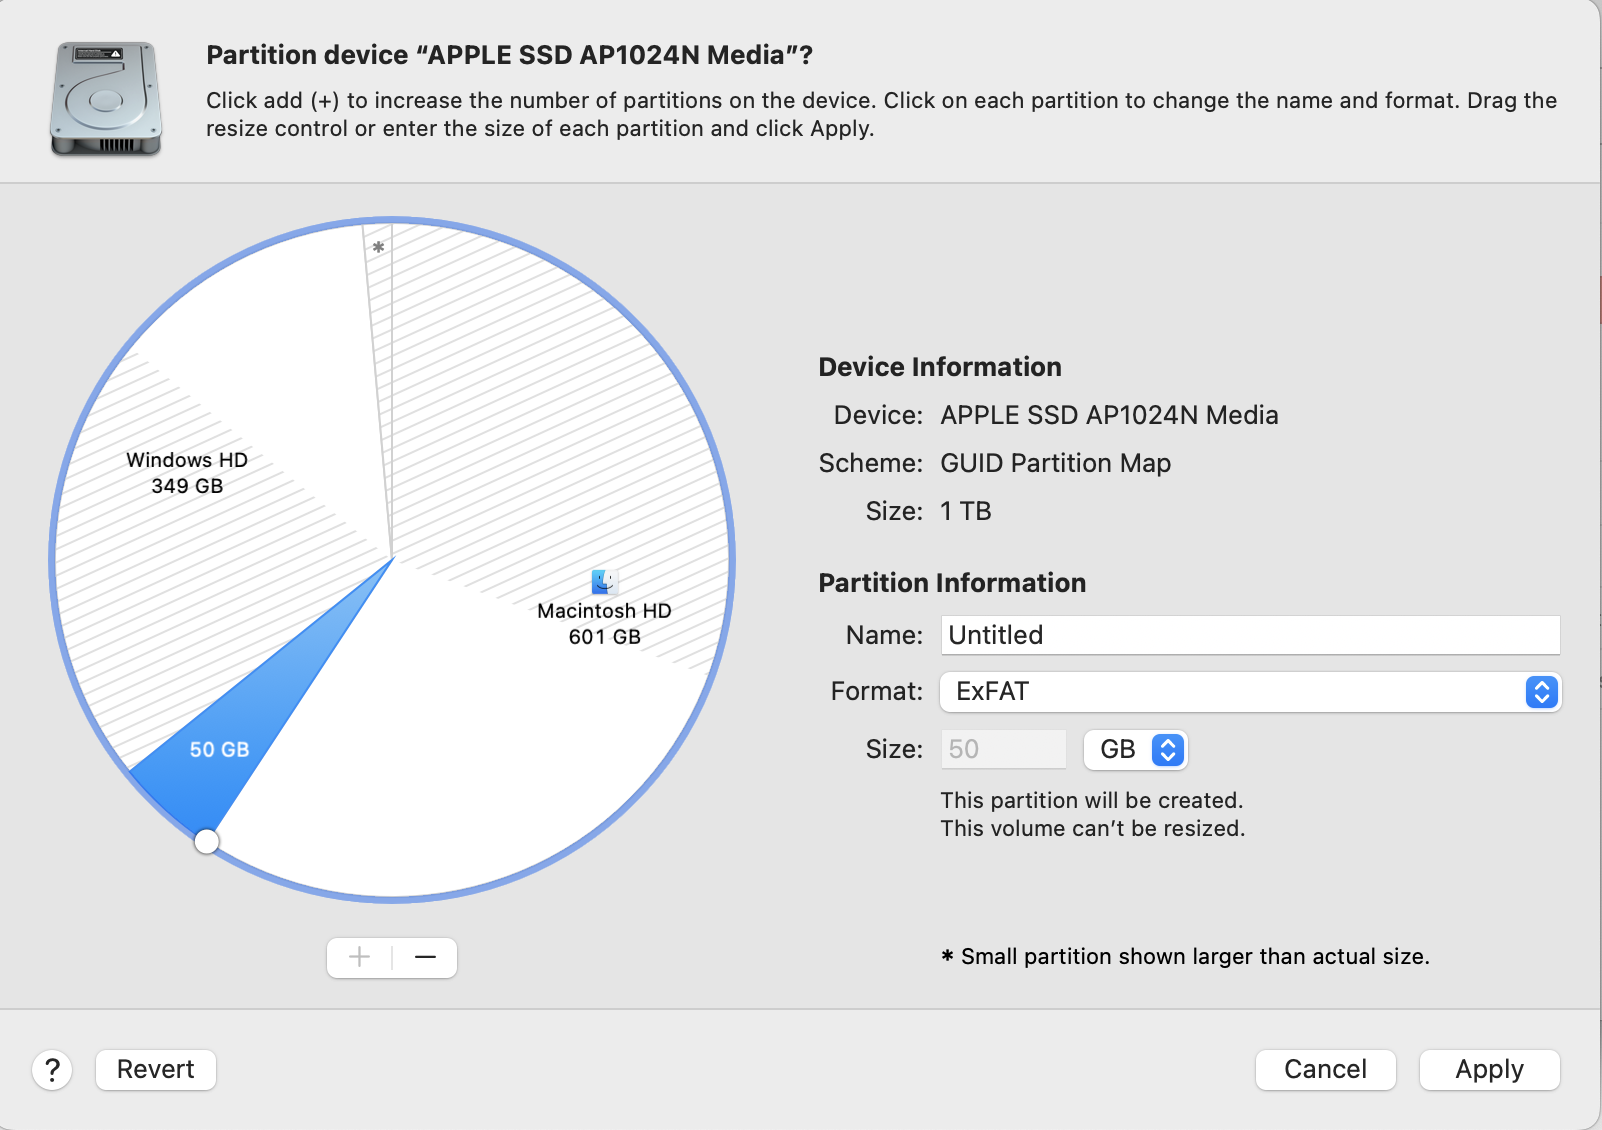
When the Apply button is clicked, Disk Utility should shrink the primary APFS container, create the new partition of the demanded size, and format it, all without damaging any data on the original Macintosh HD volume — even if it was FileVault encrypted, as mine was.
Note that it is important that this newly created partition is situated immediately adjacent and contiguous to the main Boot Camp partition. The entire resizing strategy will not work otherwise.
Step 2: Delete the partition but leave free unformatted space behind
First, in Terminal, run
diskutil list
This should produce a list of physical disks and their partitions/slices. Look for the new partition identifier that was just created in step 1. Obviously this identifier will be different depending on the specific disk layout, number of disks, slices, etc. Also, needlessly to say, be very careful in finding the correct identifier for the partition. Erasing the wrong partition will be quite unfortunate.
In my case, disk0s2 was the main macOS APFS partition, disk0s3 was the main Boot Camp partition (type was “Microsoft Basic Data”), and disk0s7 was the newly created partition from step 1. Again, YMMV.
At this point, run
diskutil eraseVolume free none identifier
where [identifier] was disk0s7. This will delete the partition and leave the space as unformatted free space. Verify this happened sucesssfully using another diskutil list.
Step 3: Use a Windows partition manager to claim free space
At this point, reboot into Boot Camp / Windows and find a partition manager. I used MiniTool Partition Wizard Free edition.
If a filesystem repair hasn’t been done in a while, use Windows’s chkdsk to scan and repair any damage to the filesystem first.
Using Partition Wizard, right click on the main Boot Camp partition C: and choose the Resize Partition option (note: not the Extend option, which did not work for me). In the subsequent panel, use the slider to expand the partition into the unformatted free space. Do not resize into all of the free space, but leave ~1 GB buffer as free space between the Mac and Windows partitions. In my attempts, taking all of the available free space caused Partition Wizard to throw some strange Error Code 19 and Error Code 24 when it tries to resize the partition, where as leaving a buffer did not cause this issue.
Click Apply and allow Partition Wizard to reboot the machine. On next boot up, it should attempt to run a resize operation, which may take 5 to 10 minutes. If it fails with some kind of filesystem error, use Partition Wizard to schedule another disk repair and try the resize again.
Step 4: Re-absorb the remaining free space back into main APFS
Reboot back into macOS. Using these notes, there would about ~1 GB of buffer space remaining between the macOS APFS container partition and the newly expanded Windows partition. This unformatted free space should be re-absorbed back into APFS via the command:
diskutil apfs resizeContainer disk0s2 0
where disk0s2 should be changed to the disk partition identifier for the main APFS container.
At this point, the procedure is complete and the Boot Camp partition should have been successfully expanded without having been erased/reformatted/reinstalled.
Perfect! Thank you very much! This is the only solution that worked for me!
Nice! That is a Very good tutorial. It worked for me but with a few tweaks.
I first didn’t understand that I needed to identify the “sub disk” on the terminal output after command.
/dev/disk0 (internal, physical):
#: TYPE NAME SIZE IDENTIFIER
0: GUID_partition_scheme *1.0 TB disk0
1: EFI EFI 314.6 MB disk0s1
2: Apple_APFS Container disk1 721.9 GB disk0s2
3: Microsoft Basic Data BOOTCAMP 278.3 GB disk0s4
I was using the name disk0 instead of like, “disk0s2”
So my new partition was formatted in APFS, and I couldn’t modify that because of my confusion. So I went ahead to Windows and used the MiniTool Partition Wizard to format that APFS piece I wanted to add to Bootcamp as NTFS. That worked fine. Then I used the ‘expand’ option on the tool and integrated the new partition into my Bootcamp partition. That went well. It rebooted, and I had to choose to boot from Windows again to finish the job. Cool.
After that, the remainder of the space was close to 16GB, which was annoying, but I went to MacOS and tried to run the commands to absorb it, but this time didn’t work, first, because it was a remainder partition NTFS formatted, so I formatted it with the Disk Utility as APFS and then tried to absorb it with the terminal commands but gave an error like this:
“…the partition is too small, and there’s an adjacent missing gap…” not exactly like this but similar.
So I went back to the Disk Utility in Mac, selected the partition and hit the ‘-‘ button, Apply, and it absorbed back the space to Macintosh HD, and voilà!
Thank you so much for the pointers. I’m grateful for you taking the time to put this together and for Apple for making it pretty straightforward on the UX/UI side of dealing with this.
For me the new partition was formatted as APFS, and when I ran
diskutil eraseVolume free none identifier
I actually got
“The target disk is in use by APFS as a Physical Store; use diskutil apfs deleteContainer”
So the actually command used by me was
diskutil apfs deleteContainer identifier
This worked for me too. On Ventura 13.6.
Take your time, follow the instructions, make sure you fully understand what you are doing when you’re doing it… If that means re-reading it more than once, then do that, because a cockup here could be quite bad.
Many thanks – great instructions.
Was nervous when Disk Utility seemed stuck on “Shrinking APFS data structures”. It took an hour or so. I probably should have done it in Recovery mode instead of on the active disk.
When I ran “diskutil eraseVolume free none identifier” it gave some error.
“diskutil apfs deleteContainer identifier” worked.
I was then able to use MiniTool Partition Wizard to Resize the Bootcamp partition to use the entirety of the freed up space.