macOS “Optimized Battery Charging” in Windows 10 / Boot Camp causes MacBook Pro battery to not charge

On a MacBook Pro 16-inch 2019 (Intel), under macOS Ventura 13.1, if

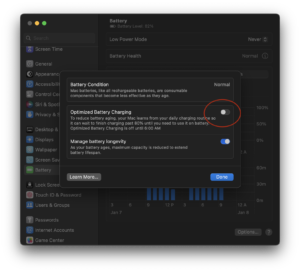
  • the “Optimized Battery Charging” option is turned on in System Settings -> Battery
  • the power adapter is plugged in
  • the battery has charged to 80% or more under macOS
  • the machine is then rebooted into Windows 10, using Boot Camp
  • then: in Windows, the battery will not charge at all. Windows will report the battery as “Plugged in” but the battery will not charge. The battery will slowly drain to 0% as the machine is used.

Solution

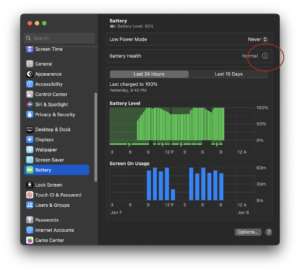
Disable Optimized Battery Charging temporarily or permanently before rebooting into Windows 10 under Boot Camp, in System Settings -> Battery -> Battery Health -> Info disclosure

Discussion

Optimized Battery Charging is a new feature introduced in recent macOS versions to preserve the health of Intel MacBook Pro batteries. It is known that if a laptop is not being used on battery, then it is best to charge to 80% instead of full. macOS purports to learn its user’s laptop battery usage patterns, and will charge the battery to 80% under normal adapter usage, and only begins charging to full when it expects the user to go to battery power soon.

However, it seems to do this by instructing some SMC/firmware level controller to stop charging the battery once current capacity hits 80% or more. When rebooted into Windows 10, which does not understand this optimized charging feature, there is no corresponding instruction to begin charging the battery again when the capacity falls below 80%. The consequence is that the laptop battery will steadily drain to 0%, and nothing will make it charge again until the machine is rebooted back into macOS.

This is an understandable edge case that Apple engineers didn’t test for. However, it seems to have started only recently (I don’t recall macOS Monterey having this behavior). Until it is fixed, if regular Windows 10 / Boot Camp usage is expected, it is best to leave the Optimized Battery Charging feature turned off on the macOS side — temporarily or permanently.

Worth noting that there are multiple other possible reasons that Windows 10 / Boot Camp is causing battery drain on a MacBook Pro. For example, the 16-inch 2019 MBP’s white 96W USB-C charger looks identical to the 87W USB-C charger from previous-gen MacBook Pro 15. If mistakenly or deliberately used to power the 16-inch MBP, then under full load the 87W adapter is insufficient to run the laptop. In this scenario the OS will tap the battery in complement with the adapter, causing a steady drain. Windows also runs more inefficiently than macOS on MacBook Pro, so under full CPU/GPU usage, it seems to take more power sometimes than even the 96W adapter can provide.

However, in either of those cases, the drain is very slow. In the case of the Optimized Battery Charging bug described above, under full CPU/GPU usage, the battery drains extremely quickly, with 30 minutes of usage causing 50% or more battery drain sometimes. This is because in this case, the laptop is not drawing power from the adapter at all.

macOS Safari displays blank page when accessing flask development server on localhost:5000

There is a very strange behavior in macOS Ventura 13.1 (and possibly earlier macOS as well), where the macOS Safari browser and the Google Chrome browser cannot access a Python Flask web development server on port 5000. The URL http://localhost:5000 either shows as completely blank, or responds with a 403 Forbidden.

Context

In short, Flask is a lightweight web application framework for Python. A typical Flask webapp is run in development mode as

flask --debug run

By default, this will start a Flask development server on port 5000:

* Debug mode: on
WARNING: This is a development server. Do not use it in a production deployment. Use a production WSGI server instead.
* Running on http://127.0.0.1:5000
Press CTRL+C to quit

From the command line, subsequently, curl can be used to reach the server

curl "http://localhost:5000/"

In my case, it responds with

Hello world

Note that localhost and 127.0.0.1 are, in typical cases, equivalent to each other. Both of them are pointing to the local machine.

Problem

If using the Safari browser on the same machine, though, and hitting http://localhost:5000, this will display a completely blank page. The development server itself will not show that a GET request was made, which suggests that the request never made it to the flask application at all.

If using the Chrome browser to hit http://localhost:5000, it will display a 403 Forbidden error instead of a blank page:

Access to localhost was denied
You don't have authorization to view this page.
HTTP ERROR 403

And again, the Flask dev server itself does not show a successful GET request being made.

As a final symptom, if instead http://127.0.0.1:5000 was used, a GET will be successfully received by the Flask dev server, and the server will respond to it normally.

Solution

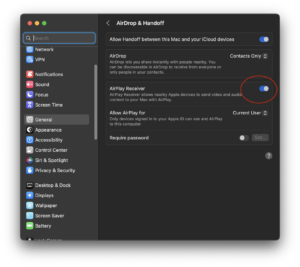
  1. On macOS Ventura, go to Settings -> General -> AirDrop & Handoff and turn off AirPlay Receiver.
  2. Alternatively, instruct Flask to use a different port for its dev server other than 5000 and access that port instead:
    flask --debug run -p 8000
  3. Alternatively, always interact with Flask on the IP literal 127.0.0.1:5000 rather than the localhost DNS name. This is what the Flask instructions say to do anyway.

Discussion

It turns out there is a port conflict, of sorts. On macOS Ventura (and possibly Monterey as well), the OS’s built-in AirPlay Receiver is also listening on TCP port 5000 for some purpose. Running

lsof -i -P

...
ControlCe  423 yliu    7u  IPv4       0t0  TCP *:5000 (LISTEN)
ControlCe  423 yliu    8u  IPv6       0t0  TCP *:5000 (LISTEN)
...
Python    1374 yliu    5u  IPv4       0t0  TCP localhost:5000 (LISTEN)

we can see that ControlCenter (really AirPlay Receiver) is listening on TCP *:5000 and the Python Flask app is listening on localhost:5000.

In fact, if the Flask server is turned off, and a curl -i command (to show response headers) is issued to localhost:5000, this is the response:
curl -i "http://localhost:5000/"

HTTP/1.1 404 Not Found
Content-Length: 0
Server: AirTunes/670.6.2

I’m not sure why this situation isn’t causing a port conflict, throwing a socket error for “address already in use”, which would block the Python app from starting at all. Similarly, I don’t understand why it doesn’t affect curl when run on the command line, which still successfully reaches the Flask server.

Nevertheless, changing Flask’s socket to an unoccupied port such as 8000, or turning off the offending macOS component AirPlay Receiver that is using the port, addresses the conflict. Now both Safari and Chrome will be able send requests to the actual Flask server, rather than the AirTunes server also residing on port 5000.

Resize Boot Camp partition on macOS Monterey with APFS without reformatting

In short, I needed to grant about 100 GB of extra space to my Bootcamp Windows partition from my Mac partition, without erasing and reinstalling Windows, on macOS 12.6 Monterey running on a 2019 Intel MacBook Pro. There is a lot of conflicting or outdated information about this procedure, including some which assert that it was impossible. It is possible, and actually, quite straightforward to resize the Boot Camp partition on macOS 12.6, even with an encrypted AFPS system volume, with minimal third party tools.

These are notes that I took to ensure that I can replicate the procedure next time.

DISCLAIMER: this is what worked for me, on my EFI-based MacBook Pro. There is no guarantee this works for other models of MacBooks or OS versions. Changing disk partitions across two operating systems always has the risk of seriously damaging partition maps and rendering data irretrievable. I am not responsible for any damage that may result if anyone follows my notes. Sorry, but again, this is what worked for me, and is no guarantee that it would work for anyone else. Keep full backups via Winclone and Time Machine in case something goes wrong!

General concept

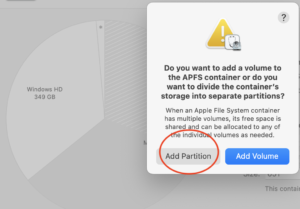
  1. Add a new partition (note: not a new APFS volume, but a new partition / APFS container) with a slightly larger size than the desired amount of space to be added to Boot Camp, via Disk Utility, which will losslessly shrink the AFPS macOS container to do so. This partition should exist adjacent to the Windows partition.
  2. Delete the partition in macOS and leave unformatted free space in its place
  3. Reboot into Boot Camp and use a Windows partition manager to claim most of the free unformatted space
  4. Re-absorb the remaining free space back into the main APFS container

Step 1: Create a new partition

On a standard Boot Camp setup, there are three major partitions — the first is the APFS container containing all the Mac volumes, the second is the Windows NTFS partition, and the third is the Windows recovery partition.

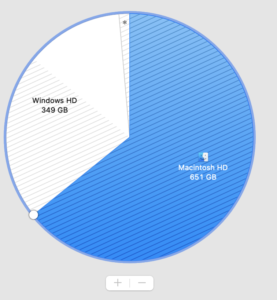
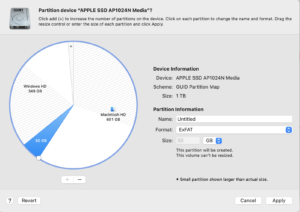
The first step is to add a new partition, right in front of the Window partition. Disk Utility in macOS can do this losslessly, by shrinking the primary APFS container. In Disk Utility, select the Apple SSD physical disk, and click the Partition button at the top of the tool bar to open the pie chart, and Click the + button to add a partition.

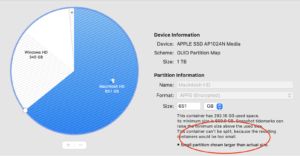
“Container can’t be split” error

In trying to add the partition, however, Disk Utility may report that “This container can’t be split, because the resulting containers would be too small.” In this case, the + (plus) or – (minus) buttons to add and remove partitions in Disk Utility will be grayed out.

This rather obtuse error actually means that the Time Machine snapshots on the primary macOS partition need to be deleted. I believe this is because macOS is using the supposed “free” space on the disk to store local Time Machine snapshots, and thus the “free space” in the container is not actually free. To be able to shrink the container, these snapshots need to be removed first in order to truly free up the space for shrinking.

Removing snapshots

First, turn off Time Machine automatic backups.

Then, in terminal, issue this command:

tmutil deletelocalsnapshots /

This should show a list of deleted snapshots. Verify the snapshots have been destroyed

tmutil listlocalsnapshots /

This should output no snapshots.

try to split the partition again

Quit the Disk Utility app if it was previously open. Wait a couple of minutes after the snapshot deletions — sometimes it seems to take Disk Utility a bit to re-detect available space. Re-open Disk Utility and try the Partition tool bar button again. This time the + button should be enabled, and it should ask whether it should create a partition or a volume. Choose the Add Partition option.

Choose a size that is slightly (by 1 GB or so) larger than the desired space to be added to Boot Camp Windows. In theory, this additional buffer space isn’t strictly necessary, but I ran into an issue in Step 3, that I had to resolve by absorbing less than the full unformatted space. Any filesystem should be ok, as we will be deleting this partition shortly afterwards anyway.

When the Apply button is clicked, Disk Utility should shrink the primary APFS container, create the new partition of the demanded size, and format it, all without damaging any data on the original Macintosh HD volume — even if it was FileVault encrypted, as mine was.

Note that it is important that this newly created partition is situated immediately adjacent and contiguous to the main Boot Camp partition. The entire resizing strategy will not work otherwise.

Step 2: Delete the partition but leave free unformatted space behind

First, in Terminal, run

diskutil list

This should produce a list of physical disks and their partitions/slices. Look for the new partition identifier that was just created in step 1. Obviously this identifier will be different depending on the specific disk layout, number of disks, slices, etc. Also, needlessly to say, be very careful in finding the correct identifier for the partition. Erasing the wrong partition will be quite unfortunate.

In my case, disk0s2 was the main macOS APFS partition, disk0s3 was the main Boot Camp partition (type was “Microsoft Basic Data”), and disk0s7 was the newly created partition from step 1. Again, YMMV.

At this point, run
diskutil eraseVolume free none identifier

where [identifier] was disk0s7. This will delete the partition and leave the space as unformatted free space. Verify this happened sucesssfully using another diskutil list.

Step 3: Use a Windows partition manager to claim free space

At this point, reboot into Boot Camp / Windows and find a partition manager. I used MiniTool Partition Wizard Free edition.

If a filesystem repair hasn’t been done in a while, use Windows’s chkdsk to scan and repair any damage to the filesystem first.

Using Partition Wizard, right click on the main Boot Camp partition C: and choose the Resize Partition option (note: not the Extend option, which did not work for me). In the subsequent panel, use the slider to expand the partition into the unformatted free space. Do not resize into all of the free space, but leave ~1 GB buffer as free space between the Mac and Windows partitions. In my attempts, taking all of the available free space caused Partition Wizard to throw some strange Error Code 19 and Error Code 24 when it tries to resize the partition, where as leaving a buffer did not cause this issue.

Click Apply and allow Partition Wizard to reboot the machine. On next boot up, it should attempt to run a resize operation, which may take 5 to 10 minutes. If it fails with some kind of filesystem error, use Partition Wizard to schedule another disk repair and try the resize again.

Step 4: Re-absorb the remaining free space back into main APFS

Reboot back into macOS. Using these notes, there would about ~1 GB of buffer space remaining between the macOS APFS container partition and the newly expanded Windows partition. This unformatted free space should be re-absorbed back into APFS via the command:

diskutil apfs resizeContainer disk0s2 0

where disk0s2 should be changed to the disk partition identifier for the main APFS container.

At this point, the procedure is complete and the Boot Camp partition should have been successfully expanded without having been erased/reformatted/reinstalled.

Using Netgear R7800 with Hurricane Electric 6in4 Tunnel

Despite living in the SF Bay Area, nominally the tech capital of the US, my previous ISP did not support IPv6. Thus, my fallback method was to use a tunnel broker to access IPv6 servers. Namely, I opted to use Hurricane Electric’s tunnelbroker.net IPv6 tunnel.

It turns out that my Netgear Nighthawk X4S R7800 router (which itself was a replacement of a previous Netgear R7800 — long story with Asurion warranty insurance for another day) does not support 6in4 tunneling, which is the technology used in tunnelbroker. Note this is different from the 6to4 tunnel that is supported in the native Netgear R7800 firmware — a technology which seems to deprecated, if the repeatedly Google captchas and warnings were any indication.

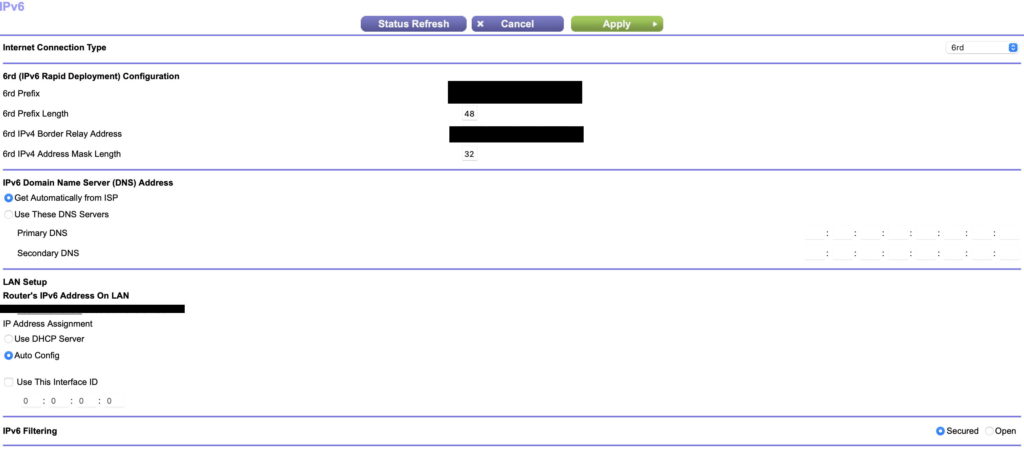
The Netgear R7800 does not support 6in4 tunneling like the Apple AirPort Extreme, but it appears that its 6rd (IPv6 Rapid Deployment) mode can be used instead with tunnelbroker.net. Since I’m not a network engineer, I’m not 100% clear on why this works, or if there are any limitations to abusing the protocol this way, but it does appear to allow access to IPv6-only servers.

In the Netgear configs, set:

  • Internet connection type — 6rd
  • 6rd Prefix — the Routed /48: value from tunnelbroker
  • 6rd Prefix Length — 48
  • 6rd IPv4 Border Relay AddressServer IPv4 Address from tunnelbroker
  • 6rd IPv4 Address Mask Length — 32

With this “6rd” configuration active on the Netgear R7800, the tunnel appears to work, and I can once again access resources on IPv6 only servers. Not sure if this is fragile or not, but I really only needed a temporary solution. Unfortunately, this also means I cannot access Netflix anymore due to Netflix’s blocking of Hurricane Electric tunnels (as a “VPN”), but that’s another story for another time.

macOS battery manufacturedate

Tried to find out the manufacturing date of my MacBook Pro’s battery. Turns out this was a non-trivial exercise, and I spent several hours on it. Worth documenting the process.

manufactureDate in macOS Mojave 10.14

Finding the right command to output battery info was easy enough:
ioreg -b -w 0 -f -r -c AppleSmartBattery

However, instead of a timestamp as I would have expected, the manufacturing date is output as:

"ManufactureDate" = nnnnn

Where nnnnn was a five digit integer that didn’t resemble any known timestamp format.

After some research, it turns out this date conforms to the Smart Battery Data Specification, which specifies:

The date is packed in the following fashion: (year-1980) * 512 + month * 32 + day

Or in bitwise form:

bits 0-4 — day
bits 5-8 — month
bits 9-15 — years since 1980

A quick bit of bitwise ops in bash:
d=12345; echo $((1980+(0x7f & $d>>9)))-$((0x0f & ($d>>5)))-$((0x1f & $d))

2004-1-25

Simply replace d with the five-digit integer shown in ioreg.

manufactureDate in macOS Big Sur 11

With another laptop on Big Sur, however, I could not figure out the new manufactureDate format. The value is now a very large integer (much longer than 5 digits, and looks to be at least 46-bits), but does not conform to any timestamp format that I know of, and I can longer find any specification that refers to this format.

Possible workaround

Right beside the ManufactureDate in ioreg is the serial number for the battery, which, at this point, is still meaningful (though Apple is about to start randomizing serial numbers). According to some Internet research, the fourth through seventh characters of serial encode the manufactureDate.

XXX8392XXXXXXXXXX

  • The fourth character in the sequence is the ending digit of the manufacturing year – e.g. 8 is 2018 (or 2028, or 2008…)
  • The fifth and sixth characters encode the manufacturing week of the year – e.g. 39 is the 39th week, which in 2018 is Sept 23 according to Wolfram Alpha
  • The seventh character encodes the day offset – e.g. 2 is +2 days from the start of the week, Sept 25, 2018

Wouldn’t it be so much easier if Apple just used ISO date stamps? Why the hassle?

Disable Safari 14 Tab Preview

UPDATE 2021-09-20:

It appears Safari 15 has removed this fallback, and the defaults key no longer works. This post remains up only for historical reasons.

Original post:

Safari 14.0 introduced a new feature, where hovering the cursor over a browser tab shows an image preview of the contents of the tab.

I find this incredibly distracting. Give me full text search over all tabs, not this nonsense. If I want to find a tab, I typically need to find textual content on it, not hover over everything squinting at a tiny image preview.

How to turn this feature off

It’s hard to say how long Apple will allow this, but currently ( Safari 14.0 ), this feature can be turned off using the Debug menu.

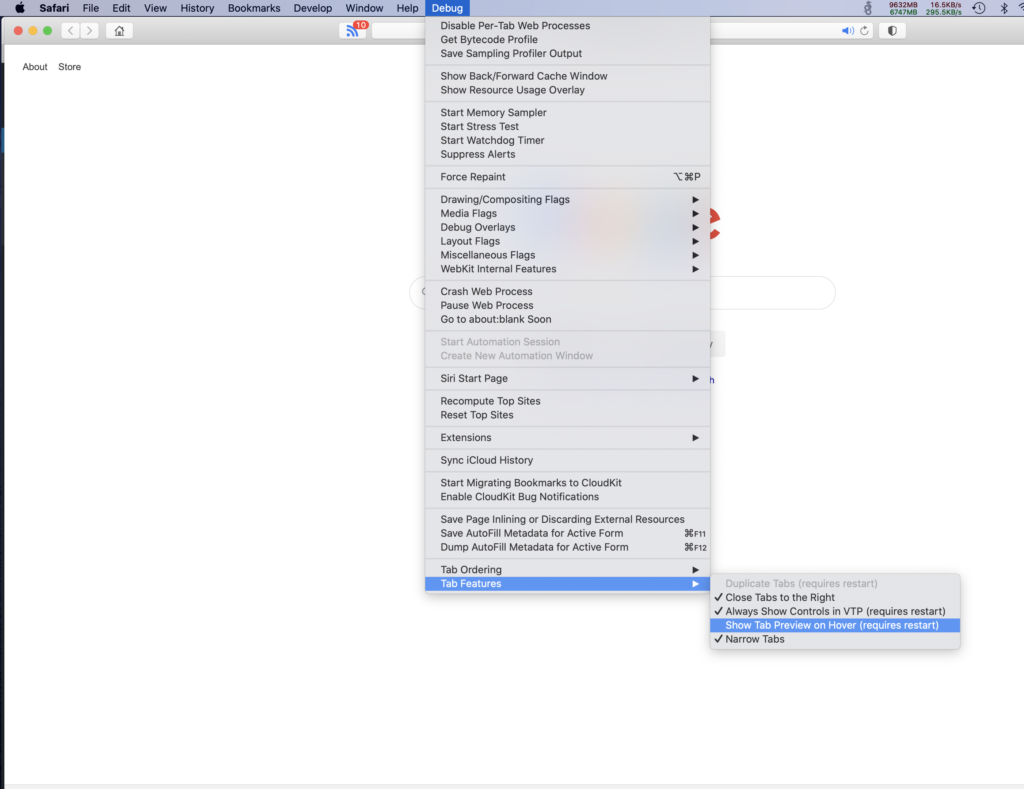
If the Debug menu is already activated (note: this is NOT the Develop menu — the Debug menu requires a secret preference defaults write to activate), the option to disable this feature is in Debug -> Tab Features -> Show Tab Preview On Hover. After disabling, a browser restart is required.

How to activate the Debug menu?

  1. Grant Full Disk Access to Terminal in System Preferences -> Security if on macOS Mojave or above. If you don’t do this, the following command will silently fail.
  2. Close the browser
  3. In Terminal, issue:
    defaults write com.apple.Safari IncludeInternalDebugMenu 1
  4. Re-open Safari

Can I just turn off tab previews using defaults?

Yes, the preference key is DebugDisableTabHoverPreview. Follow steps 1 and 2 above, then:
defaults write com.apple.Safari DebugDisableTabHoverPreview 1

Then open the browser and check.

Here’s to hoping Apple keeps this fallback for a while. Also, please implement cross-tab text search.

Creating Safari App Extensions and porting old Safari extensions

Update 2020-06-23:
Apple’s Safari Web Extensions documentation now available, along with an associated WWDC session.  These new style Web Extensions appear to follow the same API standard for Chrome and Firefox extensions.

There appears to be a porting utility for converting extensions from other browsers.

They even have a listing of what the boilerplate files do, as I had below for App Extensions.  That is definitely progress in terms of documentation writing.

I have not had a chance to play with the new API.  But hopefully the new API is standard and more JS-focused than this current hybrid system.  The native app extension appears to still be around, but I’m not clear what role it plays right now.

In any case, if you can afford to target Safari 14 only, I would hold off on making new App Extensions.  Using the webExtension standard would make everything much easier to maintain, and it is unclear for how long Apple would maintain the app extension model now that webExtensions exist.


Original post:

With the release of Safari 12 and macOS Mojave, Safari has taken a separate path from every other browser in terms of extension support, by creating a new “Safari app extension” model and deprecating old Javascript-based extensions. Like Google Chrome, Mozilla Firefox, and Microsoft Edge, old style extensions have been deactivated (with a scary and very disingenuous warning message that legacy extensions are “unsafe”). However, while all other browsers have moved to support the growing WebExtensions standard, making browser extensions easy to generate across browser platforms. Safari is using its own weird and different extension model for its new Safari App Extension system where:

  • the “global” or “background” part of the extension generally must be written in native code (Objective-C or Swift, instead of Javascript). You might be able to get away with embedding the old JS code inside WKWebview instances from the WKWebKit framework, but that is very hacky and depends on the JS code’s complexity.
  • the injected code remains in Javascript
  • all embedded into a mostly useless macOS container app that magically installs an extension (sometimes) into the browser when first run.
  • the container app (with its extension embedded) is distributed on the Mac App Store, as opposed to the old Safari Extension Gallery. the containing app can also be signed using a developer certificate and distributed outside the App Store like any other Mac app, and the extension will still operate – though I wonder if this will change in the future.

The implication, therefore, is that it is no longer enough to be a Javascript dev to make a Safari extension.  You’d also have to be a competent Swift / ObjC developer, in addition to being a competent JS developer.  In my experience, the result of the set intersection of {Swift devs, JS devs} is quite small.

In any case, leaving aside my personal opinion about this extension system and its undoubtedly negative effects on the already dwindling Safari extension ecosystem, this document constitutes my notes on porting a traditional JS-based Safari Extension to a Safari App Extension.

Disclaimer: These notes are now updated for Safari 13 and XCode 11. Future versions may drastically change the extension model, and I may or may not update this document as things change. Corrections and constructive suggestions welcome in the comments.

The Basics

How to create a Safari app extension

In the good old days, you went into Safari’s Develop menu and hit Show Extension Builder. In the brave new world of Safari App Extensions, extensions are made in Xcode, Apple’s all-purpose IDE.

Starting in Xcode 10.1, Apple has made it slightly less troublesome. In New Project, you can select “Safari Extension App” directly as one of the project templates.
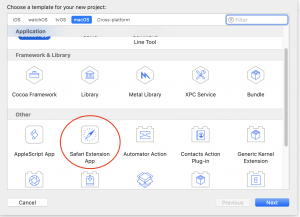
This does the exact same thing as the manual process in Xcode 10.0. It creates 2 targets:

  1. The containing app — the containing app doesn’t have much functionality unless you are also making a macOS app alongside it. It effectively is just a delivery vehicle for the extension — when the app is first run, the extension is placed in Safari’s list of extensions, for the user to activate.
  2. The extension — this target contains most of the actual code that will run in Safari’s context.

If for some reason you are still using Xcode 10.0, you have to make a generic Cocoa macOS app, then File -> New -> Target and pick Safari Extension from the list of app extension targets.  This also applies if you want to add an Extension target to an app project that was already made.

What are all these boilerplate files

The templates for the containing app are largely irrelevant for stand-alone Safari Extensions. For me, I am building Safari extensions that stand on their own. If you are building an app that happens to offer a Safari extension as a side effect, that purpose is out of scope for this document, but you may find something useful in here for building the extension itself.

The meat of a Safari App Extension lives in the extension target. I am using an Objective-C project in these examples, but the Swift project looks very similar.
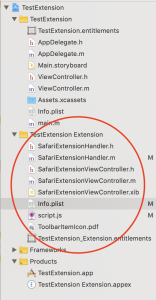
  • SafariExtensionHandler — this class is the delegate that gets called by Safari to do things. The main functionality of your extension are invoked from here. In porting old extensions, what used to live in global.js now needs to be in this file. Obviously, such code need to be ported from Javscript into Objective-C or Swift. This SafariExtensionHandler object gets created and destroyed frequently during Safari’s lifetime, so don’t expect to put global initializers here without wrapping them in dispatch_once or making a custom singleton class.
  • SafariExtensionViewController — this class is perhaps more appropriately called SafariExtensionToolbarPopoverController. This is the ViewController class that is invoked if your extension’s toolbar button (singular — you are only allowed 1 toolbar button, ever) is clicked. As of Safari 12, this class only used to show a popover from the toolbar button. The template code creates a singleton class for this controller.
  • SafariExtensionViewController.xib — the Interface Builder file for the toolbar popover. If you’ve done any Cocoa or iOS programming at all, this is effectively the same thing as any nib file. In short, you can lay out your user interface for the toolbar popover in this xib file, and load it during runtime (as opposed to having to programmatically create each UI element).
  • Info.plist — This file should be familiar to anyone who made legacy Safari extensions. It is an Apple plist file (obviously) that largely contains the same kind of extension metadata, like what domains the extension is allowed to access, what content script should be injected. The template project’s Info.plist does not contain all the possible keys, like SFSafariStylesheet (injected stylesheet) or SFSafariContextMenu (context menus), etc. There is also no convenient list of all possible keys, though you can eventually find all of them by reading through Apple’s documentation on Safari App Extension property list keys.
  • script.js — this is the content script (what used to be called the injected script in legacy Safari extensions), a Javascript file that is injected into every allowed domain. Javascript code that used to be in injected scripts need to be migrated here. There no longer seems to be a distinction between start scripts and end scripts — if you need the injected script to be an end script, the template code demonstrates that you can wrap it in a callback from the DOMContentLoaded event.
  • ToolbarItemIcon.pdf — the name is self explanatory. This is the icon that shows up in the toolbar if you have a toolbar item.
  • .entitlements – Safari App Extensions need to be sandboxed. If you try to turn off the sandbox, the extension will no longer appear in Safari. The entitlements file allows you to grant specific sandbox permissions for the extension. I haven’t played with this much, but I assume this works like any other sandboxed app. It also allows you to specify an App Group. This is also a relatively advanced macOS / iOS dev topic that is out of scope for this document, but in short, if you put your extension and the containing app in the same App Group, they can share UserDefaults preferences and other system-provided storage space. Otherwise, the containing app and the extension will maintain their own separate preference and storage space.

How to debug

When you click “Run” in the Xcode project for an Safari Extension app, it builds both the extension and the containing app, and then runs the containing app. This should install the extension into Safari, but by default the extension is disabled until the user manually activates it.
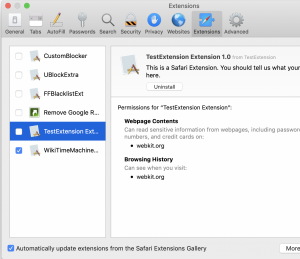
During development, you can instead run the App Extension target itself, by switching the scheme from the XCode toolbar.
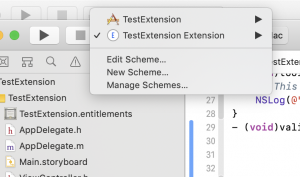
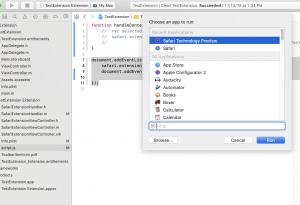
If you run the App Extension itself, a menu pops up asking for which browser to run it with (which can be Safari Technology Preview as well). It will then temporarily install the extension for the duration of the debug session. If run this way, you can also see any NSLog debugging print statements in XCode’s console, as well as use the built-in debugger to step through native code.
Architectural difference: global.js -> SafariExtensionHandler

Legacy Safari extensions were pure Javascript code, split into a global.html page that ran in the background in its own context, and injected script files that were injected into the context of every accessible web page. Only global.html/global.js could interact with the larger Safari extension environment, and only the injected scripts could interact with the currently loaded web pages. These two separate worlds communicated with each other using message dispatches – global.html/global.js would push data to the injected scripts through safari.application.activeBrowserWindow.activeTab.page.dispatchMessage, while listening on safari.application.addEventListener for any messages coming back. Injected scripts would push data to the global page using the tab proxy safari.self.tab.dispatchMessage, and listen to messages from the global page using safari.self.addEventListener.

Safari App Extensions have a similar architecture. However, it has torn out the global.js/global.html portion of this, and replaced it with native code implemented in SafariExtensionHandler.

  • From SafariExtensionHandler:
    • Listen to messages from content scripts by implementing the method in SafariExtensionHandler: (void)messageReceivedWithName:(NSString *)messageName fromPage:(SFSafariPage *)page userInfo:(NSDictionary *)userInfo. The template project provides a skeleton for you. It ends up looking something like:
      - (void)messageReceivedWithName:(NSString *)messageName fromPage:(SFSafariPage *)page userInfo:(NSDictionary *)userInfo
      {
          // This method will be called when a content script provided by your extension calls safari.extension.dispatchMessage("message").
          [page getPagePropertiesWithCompletionHandler:^(SFSafariPageProperties *properties)
           {
               // NSLog(@"The extension received a message (%@) from a script injected into (%@) with userInfo (%@)", messageName, properties.url, userInfo);
               if ([messageName isEqualToString:@"command-from-content-script"]) {
                   // do things
                   NSDictionary *results = @{@"result" : @"Hello world", @"date" : [NSDate date]};
                   [page dispatchMessageToScriptWithName:@"command-done" userInfo:results];
               }
           }
           ];
      }
      
    • Dispatch messages to content scripts using: [page dispatchMessageToScriptWithName:@"messageNameHere" userInfo:....]where page is a SFSafariPage object that is either provided during a delegate callback, or retrievable using the SFSafariApplication class method + (void)getActiveWindowWithCompletionHandler:(void (^)(SFSafariWindow * _Nullable activeWindow))completionHandler;
      - (void)contextMenuItemSelectedWithCommand:(NSString *)command
                                          inPage:(SFSafariPage *)page userInfo:(NSDictionary *)userInfo
      {
          if ([command isEqualToString:@"contextmenu_1"]) {
              NSLog(@"contextmenu_1 invoked");
              [page dispatchMessageToScriptWithName:@"contextmenu_1_invoked" userInfo:@{@"result" : @"context_menu_1 works!"}];
          }
      }
      
  • From content script:
    • Listen to messages from the extension using safari.self.addEventListener, same as before.
    • Dispatch messages the global extension using: safari.extension.dispatchMessage
  • Apple documentation on App Extension message passing is reasonably good here

Do I really have to port all my global.js / background.js Javascript code to Swift / Objective-C?

As a test, I made a small Safari app extension using a fairly trivial global.js. The idea is that we embed a WKWebview instance inside the app extension, and have that WKWebview view act as a bridge between the old global.js and the new content script. The WKWebview loads the old global.html file, and shuttles calls from the injected script to the JS inside itself using evaluateJavascript, and then dispatches the evaluated results back to the content script.

For a trivial example, this approach seems to work — though I have not tested it extensively. I imagine for complex use cases though, the time spent re-building global.js to work inside a WKWebview is about the same (or more) than just rewriting it in Objective-C or Swift.

Injecting content scripts and stylesheets

In legacy Safari extensions, the extension builder had a nice UI to add scripts and stylesheets for injection. For app extensions, plist XML will have to be specified manually (or using the built-in plist editor in Xcode)

        <key>SFSafariContentScript</key>
        <array>
	    <dict>
		 <key>Script</key>
		 <string>script.js</string>
	    </dict>
        </array>
        <key>SFSafariStyleSheet</key>
        <array>
            <dict>
                <key>Style Sheet</key>
                <string>injected.css</string>
            </dict>
        </array>
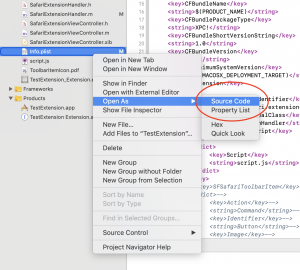
By using Open As -> Source Code, you can edit the XML directly if messing around with plist editor is not your thing. However, plists are a specific format, with arrays and dict representations that are annoying to write raw XML with, if not using a plist-aware editor.

Context menus

Context menus have only changed a little from the legacy Safari extension architecture. You still specify context menus in the Info.plist, and they still interact largely the same way as in legacy extensions.
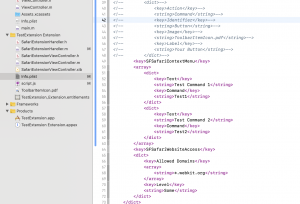
As of this post’s date, Apple’s porting guide states that “In a Safari App extension, there’s no validation of contextual menu items before the menu is displayed.” This is actually wrong. The API does provide for validation of contextual menu items before the menu is displayed.

In SafariExtensionHandler, implementing the validateContextMenuItemWithCommand method will let the extension decide whether to show or hide a context menu item, and whether to change its menu text depending on conditions.

- (void)validateContextMenuItemWithCommand:(NSString *)command
                                    inPage:(SFSafariPage *)page
                                  userInfo:(NSDictionary *)userInfo
                         validationHandler:(void (^)(BOOL shouldHide, NSString *text))validationHandler
{
    if ([command isEqualToString:@"Test1"]) {
        validationHandler(NO, @"Test1 nondefault text");
    } else if ([command isEqualToString:@"Test2"]) {
        validationHandler(YES, nil);
    }
}

As it suggests, validationHandler returns NO for shouldHide if the menu item should be displayed, or YES if it should be hidden. The text parameter allows for the menu text to be changed dynamically during validation.

What if we need to change which menu to show depending on if something exists on the web page or not? In the injected content script, listening to the “contextmenu” event and implementing a handler will allow you to populate userInfo dictionary with data, and validateContextMenuItemWithCommand will be called with that data.

function handleContextMenu(event)
{
    var data = {};
    // do some work and populate data
    safari.extension.setContextMenuEventUserInfo(event, data);

}

document.addEventListener("DOMContentLoaded", function(event) {
    document.addEventListener("contextmenu", handleContextMenu, false);

});

Handling the actual context command, once invoked by the user, requires implementing the method - (void)contextMenuItemSelectedWithCommand:(NSString *)command
inPage:(SFSafariPage *)page userInfo:(NSDictionary *)userInfo

The code is again very similar to how validation is done.

Toolbar: Buttons and Popovers

Safari App Extensions appear to be limited to a single toolbar button. Safari App Extensions cannot provide full toolbars (called “extension bars”, previously), like legacy extensions could.

The toolbar button can be configured to trigger one of two actions: Command which invokes a command immediately, or Popover which creates the popover view as provided by SafariExtensionViewController. The “menu” action that legacy Safari Extensions had, which simply created a menu of commands to choose from, has been removed. See the guide on Toolbar Item Keys.

To respond to a toolbar button click, implement - (void)toolbarItemClickedInWindow:(SFSafariWindow *)window in SafariExtensionHandler.

To show a popover on click, implement - (SFSafariExtensionViewController *)popoverViewController. This should be part of the boilerplate code generated by XCode.

Popovers are no longer HTML pages. They are now native AppKit views, created the same way as any macOS app’s views; legacy popovers would have to be ported to native code, or hacked using a WebView. The UI controls available to the popover are native macOS controls (NSButton, NSTextField, etc.), and must be created and styled using Interface Builder (or programmatically). These UI elements can be wired up to the SafariExtensionViewController singleton, which can provide the delegate methods to respond as the controls are changed.

Notes and references

Converting a Legacy Safari Extension to a Safari App Extension — As of the time of this post, there is a heading in this brief Apple document called “Convert Legacy Safari Extensions Automatically”. You might imagine that this implies there is some kind of tool that automatically converts legacy extensions into app extensions, but this is not the case. That section actually describes how you can uninstall a previous legacy Safari extension in favor of an updated app extension (that you still have to write, yourself, manually). So the “two options” that they mention is actually just one option, with a preface of how to remove a previous version of the extension written in legacy/JS form.

Safari App Extension Guide

Safari App Extension Property List Keys
IKEv2 VPN on Ubuntu – IKE authentication credentials are unacceptable

I used these straightforward strongswan IKEv2 VPN setup instructions to set up a IKEv2 VPN on my Ubuntu server.

However, instead of self-generating my own certificate authority and having to deal with manually trusting this untrusted CA on every device I have to use VPN on, I decided that since I had letsencrypt in standalone mode set up on my server already (and the vpn subdomain properly covered under the certificate), I might as well use that certificate instead. I’m sure I’m committing half a dozen security sins, but it saves me time that I used to spend googling “how to trust certificate authority on [device name]”.

Setting up letsencrypt certificates with strongswan-based VPN is out of scope for this post, but in short, the difference is minimal. Instead of using the fake CA’s .pem, just symlink the letsencrypt certificate and key to /etc/ipsec.d/certs and /etc/ipsec.d/private. Remember to add a post_hook to /etc/letsencrypt/renewal/ to reboot strongswan after certificate renewal.

This worked great on macOS High Sierra and iOS 11. However, Windows 10 (Fall Creators) refused to connect to the VPN, stating that “IKE authentication credentials are unacceptable”.

The top google results for this were highly misleading for this particular context. It’s not about subjectAltName or Server Authentication flags or whatever.

It turns out that unlike macOS or iOS, Windows 10 wasn’t processing the full set of root and intermediate CA certificates, even though I symlinked the fullchain.pem to /etc/ipsec.d/certs. After throwing a symlink from /etc/letsencrypt/live/[domain]/chain.pem to /etc/ipsec.d/cacerts, Windows finally relented and let me connect to the VPN.

YMMV, because judging by the Google results, there are a lot of sources of error that yield the exact same, mildly useless “IKE authentication credentials are unacceptable” error message. However, this particular error is non-obvious, and worth looking at if you’re running into the same issue.

Safari Technology Preview crossed out in macOS 10.13 High Sierra

If you’ve just upgraded to macOS 10.13 High Sierra from 10.12 and are wondering why Safari Technology Preview is crossed out with a white 🚫 prohibited/cross mark and unable to be launched, turns out there is a separate Safari Tech Preview version for High Sierra. Confusingly, the App Store / updater does not automatically upgrade to this version when you install High Sierra, so the old version left over in /Applications is just…sitting there, broken.

Go back to the Apple Developer downloads page for Safari, grab the “Safari Technology Preview for macOS High Sierra” installer, and install it over the existing Safari Technology Preview. The app should then launch.

Resolving endless Apple Pay add card loop after Time Machine restore

UPDATE:

There appears to be a new directory at /private/var/db/applepay/Library/NFStorage in later versions of macOS. This directory may have to be cleared as well. YMMV.

Original:

If you recently had your Macbook Pro (Touch Bar) repaired (possibly with a logic board replacement), and restored from Time Machine backup, you might find yourself unable to use Apple Pay on Mac OS 10.12.5. The system will report “Apple Pay is already configured on this disk for another Mac” and ask you to “Reset Apple Pay and Add Card”. If you try to do so by authorizing it using fingerprint or password, it will immediately drop you back to the original “Apple Pay is already configured on this disk for another Mac” prompt, going back into this cycle ad infinitum.

The issue is that there is an Apple Pay cache at /private/var/db/applepay/ on the system that has been invalidated, but it seems to be unable to delete this cache properly. It will keep trying to refresh this cached data, and fail to do so.

There is a workaround for this. Obligatory warning: THIS IS MESSING WITH SYSTEM FILES. DO NOT EXECUTE ANY OF THIS IF YOU ARE NOT SURE WHAT YOU ARE DOING AND DO NOT HAVE A BACKUP OF YOUR DATA. TYPING THE COMMANDS WRONG MAY CAUSE SERIOUS ISSUES WITH YOUR MAC.

I used this process myself to good success under 10.12.5, on my Macbook Pro. YMMV if you decide to try this on any other version of Mac OS.

To fix this endless loop, you need to first clear out all the files (but not the folders) inside /private/var/db/applepay/. Open Terminal.app and enter the following commands:

# get a root shell
sudo -s
# move the stale files away
mv /private/var/db/applepay/Library/Caches/* ~/.Trash/
mv /private/var/db/applepay/Library/Preferences/* ~/.Trash/
# kill the related cache servers
pkill seld; pkill nfcd;

Then:
– Wait a few seconds for the relevant servers to boot themselves up again. Then, go back to System Preferences, hit Add Card…

– It will fail the first time with a mysterious error. That’s fine. Hit Add Card again…

– On this second try, it will say “Apple Pay is already configured on this disk for another Mac”.

– When you hit “Reset Apple Pay and Add Card” for the final time, it will actually break past the loop, and you will get to re-enter your Apple Pay card information without further issue.

It’s a relatively easy fix, so I imagine the next OS version will have addressed this problem in a more elegant way.