Resize Boot Camp partition on macOS Monterey with APFS without reformatting

In short, I needed to grant about 100 GB of extra space to my Bootcamp Windows partition from my Mac partition, without erasing and reinstalling Windows, on macOS 12.6 Monterey running on a 2019 Intel MacBook Pro. There is a lot of conflicting or outdated information about this procedure, including some which assert that it was impossible. It is possible, and actually, quite straightforward to resize the Boot Camp partition on macOS 12.6, even with an encrypted AFPS system volume, with minimal third party tools.

These are notes that I took to ensure that I can replicate the procedure next time.

DISCLAIMER: this is what worked for me, on my EFI-based MacBook Pro. There is no guarantee this works for other models of MacBooks or OS versions. Changing disk partitions across two operating systems always has the risk of seriously damaging partition maps and rendering data irretrievable. I am not responsible for any damage that may result if anyone follows my notes. Sorry, but again, this is what worked for me, and is no guarantee that it would work for anyone else. Keep full backups via Winclone and Time Machine in case something goes wrong!

General concept

  1. Add a new partition (note: not a new APFS volume, but a new partition / APFS container) with a slightly larger size than the desired amount of space to be added to Boot Camp, via Disk Utility, which will losslessly shrink the AFPS macOS container to do so. This partition should exist adjacent to the Windows partition.
  2. Delete the partition in macOS and leave unformatted free space in its place
  3. Reboot into Boot Camp and use a Windows partition manager to claim most of the free unformatted space
  4. Re-absorb the remaining free space back into the main APFS container

Step 1: Create a new partition

On a standard Boot Camp setup, there are three major partitions — the first is the APFS container containing all the Mac volumes, the second is the Windows NTFS partition, and the third is the Windows recovery partition.

The first step is to add a new partition, right in front of the Window partition. Disk Utility in macOS can do this losslessly, by shrinking the primary APFS container. In Disk Utility, select the Apple SSD physical disk, and click the Partition button at the top of the tool bar to open the pie chart, and Click the + button to add a partition.

“Container can’t be split” error

In trying to add the partition, however, Disk Utility may report that “This container can’t be split, because the resulting containers would be too small.” In this case, the + (plus) or – (minus) buttons to add and remove partitions in Disk Utility will be grayed out.

This rather obtuse error actually means that the Time Machine snapshots on the primary macOS partition need to be deleted. I believe this is because macOS is using the supposed “free” space on the disk to store local Time Machine snapshots, and thus the “free space” in the container is not actually free. To be able to shrink the container, these snapshots need to be removed first in order to truly free up the space for shrinking.

Removing snapshots

First, turn off Time Machine automatic backups.

Then, in terminal, issue this command:

tmutil deletelocalsnapshots /

This should show a list of deleted snapshots. Verify the snapshots have been destroyed

tmutil listlocalsnapshots /

This should output no snapshots.

try to split the partition again

Quit the Disk Utility app if it was previously open. Wait a couple of minutes after the snapshot deletions — sometimes it seems to take Disk Utility a bit to re-detect available space. Re-open Disk Utility and try the Partition tool bar button again. This time the + button should be enabled, and it should ask whether it should create a partition or a volume. Choose the Add Partition option.

Choose a size that is slightly (by 1 GB or so) larger than the desired space to be added to Boot Camp Windows. In theory, this additional buffer space isn’t strictly necessary, but I ran into an issue in Step 3, that I had to resolve by absorbing less than the full unformatted space. Any filesystem should be ok, as we will be deleting this partition shortly afterwards anyway.

When the Apply button is clicked, Disk Utility should shrink the primary APFS container, create the new partition of the demanded size, and format it, all without damaging any data on the original Macintosh HD volume — even if it was FileVault encrypted, as mine was.

Note that it is important that this newly created partition is situated immediately adjacent and contiguous to the main Boot Camp partition. The entire resizing strategy will not work otherwise.

Step 2: Delete the partition but leave free unformatted space behind

First, in Terminal, run

diskutil list

This should produce a list of physical disks and their partitions/slices. Look for the new partition identifier that was just created in step 1. Obviously this identifier will be different depending on the specific disk layout, number of disks, slices, etc. Also, needlessly to say, be very careful in finding the correct identifier for the partition. Erasing the wrong partition will be quite unfortunate.

In my case, disk0s2 was the main macOS APFS partition, disk0s3 was the main Boot Camp partition (type was “Microsoft Basic Data”), and disk0s7 was the newly created partition from step 1. Again, YMMV.

At this point, run
diskutil eraseVolume free none identifier

where [identifier] was disk0s7. This will delete the partition and leave the space as unformatted free space. Verify this happened sucesssfully using another diskutil list.

Step 3: Use a Windows partition manager to claim free space

At this point, reboot into Boot Camp / Windows and find a partition manager. I used MiniTool Partition Wizard Free edition.

If a filesystem repair hasn’t been done in a while, use Windows’s chkdsk to scan and repair any damage to the filesystem first.

Using Partition Wizard, right click on the main Boot Camp partition C: and choose the Resize Partition option (note: not the Extend option, which did not work for me). In the subsequent panel, use the slider to expand the partition into the unformatted free space. Do not resize into all of the free space, but leave ~1 GB buffer as free space between the Mac and Windows partitions. In my attempts, taking all of the available free space caused Partition Wizard to throw some strange Error Code 19 and Error Code 24 when it tries to resize the partition, where as leaving a buffer did not cause this issue.

Click Apply and allow Partition Wizard to reboot the machine. On next boot up, it should attempt to run a resize operation, which may take 5 to 10 minutes. If it fails with some kind of filesystem error, use Partition Wizard to schedule another disk repair and try the resize again.

Step 4: Re-absorb the remaining free space back into main APFS

Reboot back into macOS. Using these notes, there would about ~1 GB of buffer space remaining between the macOS APFS container partition and the newly expanded Windows partition. This unformatted free space should be re-absorbed back into APFS via the command:

diskutil apfs resizeContainer disk0s2 0

where disk0s2 should be changed to the disk partition identifier for the main APFS container.

At this point, the procedure is complete and the Boot Camp partition should have been successfully expanded without having been erased/reformatted/reinstalled.

Creating Safari App Extensions and porting old Safari extensions

Update 2020-06-23:
Apple’s Safari Web Extensions documentation now available, along with an associated WWDC session.  These new style Web Extensions appear to follow the same API standard for Chrome and Firefox extensions.

There appears to be a porting utility for converting extensions from other browsers.

They even have a listing of what the boilerplate files do, as I had below for App Extensions.  That is definitely progress in terms of documentation writing.

I have not had a chance to play with the new API.  But hopefully the new API is standard and more JS-focused than this current hybrid system.  The native app extension appears to still be around, but I’m not clear what role it plays right now.

In any case, if you can afford to target Safari 14 only, I would hold off on making new App Extensions.  Using the webExtension standard would make everything much easier to maintain, and it is unclear for how long Apple would maintain the app extension model now that webExtensions exist.


Original post:

With the release of Safari 12 and macOS Mojave, Safari has taken a separate path from every other browser in terms of extension support, by creating a new “Safari app extension” model and deprecating old Javascript-based extensions. Like Google Chrome, Mozilla Firefox, and Microsoft Edge, old style extensions have been deactivated (with a scary and very disingenuous warning message that legacy extensions are “unsafe”). However, while all other browsers have moved to support the growing WebExtensions standard, making browser extensions easy to generate across browser platforms. Safari is using its own weird and different extension model for its new Safari App Extension system where:

  • the “global” or “background” part of the extension generally must be written in native code (Objective-C or Swift, instead of Javascript). You might be able to get away with embedding the old JS code inside WKWebview instances from the WKWebKit framework, but that is very hacky and depends on the JS code’s complexity.
  • the injected code remains in Javascript
  • all embedded into a mostly useless macOS container app that magically installs an extension (sometimes) into the browser when first run.
  • the container app (with its extension embedded) is distributed on the Mac App Store, as opposed to the old Safari Extension Gallery. the containing app can also be signed using a developer certificate and distributed outside the App Store like any other Mac app, and the extension will still operate – though I wonder if this will change in the future.

The implication, therefore, is that it is no longer enough to be a Javascript dev to make a Safari extension.  You’d also have to be a competent Swift / ObjC developer, in addition to being a competent JS developer.  In my experience, the result of the set intersection of {Swift devs, JS devs} is quite small.

In any case, leaving aside my personal opinion about this extension system and its undoubtedly negative effects on the already dwindling Safari extension ecosystem, this document constitutes my notes on porting a traditional JS-based Safari Extension to a Safari App Extension.

Disclaimer: These notes are now updated for Safari 13 and XCode 11. Future versions may drastically change the extension model, and I may or may not update this document as things change. Corrections and constructive suggestions welcome in the comments.

The Basics

How to create a Safari app extension

In the good old days, you went into Safari’s Develop menu and hit Show Extension Builder. In the brave new world of Safari App Extensions, extensions are made in Xcode, Apple’s all-purpose IDE.

Starting in Xcode 10.1, Apple has made it slightly less troublesome. In New Project, you can select “Safari Extension App” directly as one of the project templates.

This does the exact same thing as the manual process in Xcode 10.0. It creates 2 targets:

  1. The containing app — the containing app doesn’t have much functionality unless you are also making a macOS app alongside it. It effectively is just a delivery vehicle for the extension — when the app is first run, the extension is placed in Safari’s list of extensions, for the user to activate.
  2. The extension — this target contains most of the actual code that will run in Safari’s context.

If for some reason you are still using Xcode 10.0, you have to make a generic Cocoa macOS app, then File -> New -> Target and pick Safari Extension from the list of app extension targets.  This also applies if you want to add an Extension target to an app project that was already made.

What are all these boilerplate files

The templates for the containing app are largely irrelevant for stand-alone Safari Extensions. For me, I am building Safari extensions that stand on their own. If you are building an app that happens to offer a Safari extension as a side effect, that purpose is out of scope for this document, but you may find something useful in here for building the extension itself.

The meat of a Safari App Extension lives in the extension target. I am using an Objective-C project in these examples, but the Swift project looks very similar.

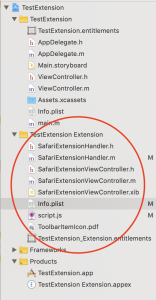
  • SafariExtensionHandler — this class is the delegate that gets called by Safari to do things. The main functionality of your extension are invoked from here. In porting old extensions, what used to live in global.js now needs to be in this file. Obviously, such code need to be ported from Javscript into Objective-C or Swift. This SafariExtensionHandler object gets created and destroyed frequently during Safari’s lifetime, so don’t expect to put global initializers here without wrapping them in dispatch_once or making a custom singleton class.
  • SafariExtensionViewController — this class is perhaps more appropriately called SafariExtensionToolbarPopoverController. This is the ViewController class that is invoked if your extension’s toolbar button (singular — you are only allowed 1 toolbar button, ever) is clicked. As of Safari 12, this class only used to show a popover from the toolbar button. The template code creates a singleton class for this controller.
  • SafariExtensionViewController.xib — the Interface Builder file for the toolbar popover. If you’ve done any Cocoa or iOS programming at all, this is effectively the same thing as any nib file. In short, you can lay out your user interface for the toolbar popover in this xib file, and load it during runtime (as opposed to having to programmatically create each UI element).
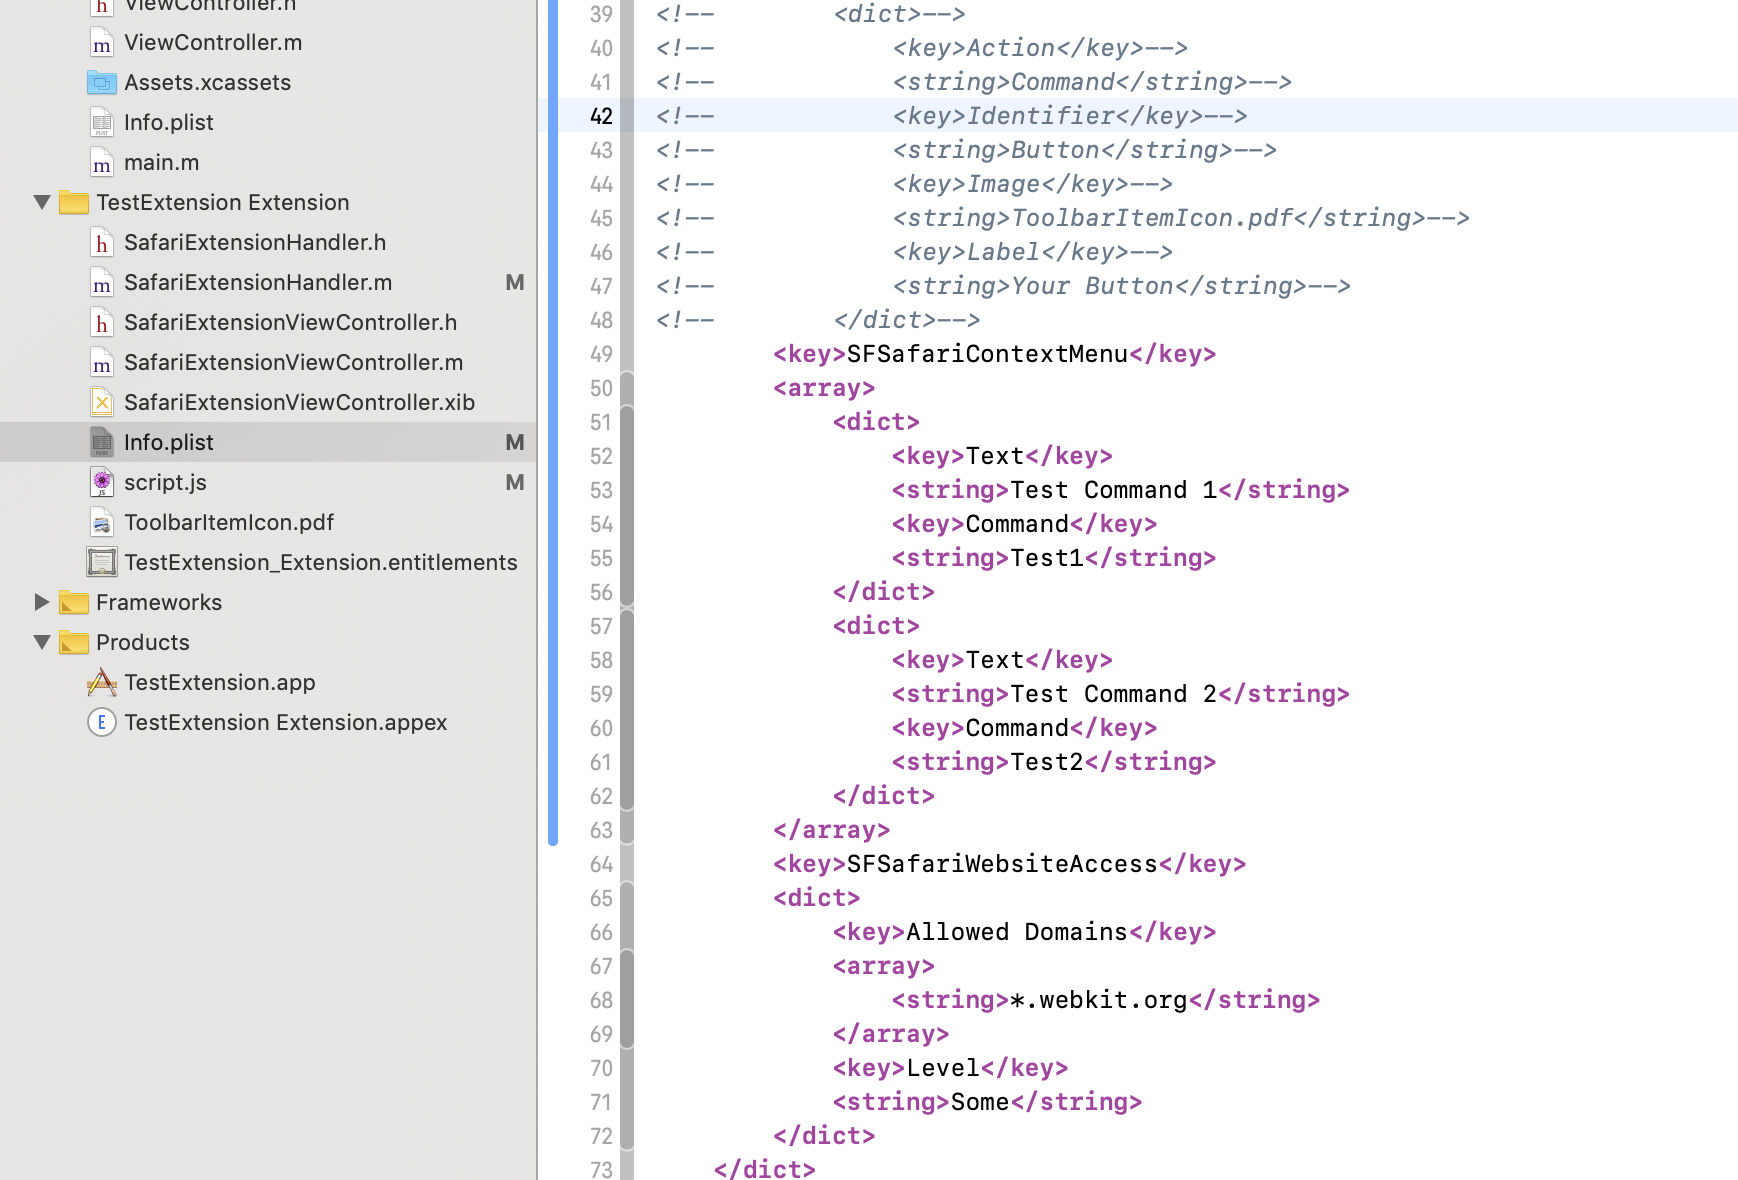
  • Info.plist — This file should be familiar to anyone who made legacy Safari extensions. It is an Apple plist file (obviously) that largely contains the same kind of extension metadata, like what domains the extension is allowed to access, what content script should be injected. The template project’s Info.plist does not contain all the possible keys, like SFSafariStylesheet (injected stylesheet) or SFSafariContextMenu (context menus), etc. There is also no convenient list of all possible keys, though you can eventually find all of them by reading through Apple’s documentation on Safari App Extension property list keys.
  • script.js — this is the content script (what used to be called the injected script in legacy Safari extensions), a Javascript file that is injected into every allowed domain. Javascript code that used to be in injected scripts need to be migrated here. There no longer seems to be a distinction between start scripts and end scripts — if you need the injected script to be an end script, the template code demonstrates that you can wrap it in a callback from the DOMContentLoaded event.
  • ToolbarItemIcon.pdf — the name is self explanatory. This is the icon that shows up in the toolbar if you have a toolbar item.
  • .entitlements – Safari App Extensions need to be sandboxed. If you try to turn off the sandbox, the extension will no longer appear in Safari. The entitlements file allows you to grant specific sandbox permissions for the extension. I haven’t played with this much, but I assume this works like any other sandboxed app. It also allows you to specify an App Group. This is also a relatively advanced macOS / iOS dev topic that is out of scope for this document, but in short, if you put your extension and the containing app in the same App Group, they can share UserDefaults preferences and other system-provided storage space. Otherwise, the containing app and the extension will maintain their own separate preference and storage space.

How to debug

When you click “Run” in the Xcode project for an Safari Extension app, it builds both the extension and the containing app, and then runs the containing app. This should install the extension into Safari, but by default the extension is disabled until the user manually activates it.

During development, you can instead run the App Extension target itself, by switching the scheme from the XCode toolbar.

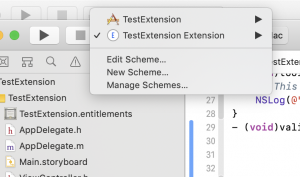
If you run the App Extension itself, a menu pops up asking for which browser to run it with (which can be Safari Technology Preview as well). It will then temporarily install the extension for the duration of the debug session. If run this way, you can also see any NSLog debugging print statements in XCode’s console, as well as use the built-in debugger to step through native code.

Architectural difference: global.js -> SafariExtensionHandler

Legacy Safari extensions were pure Javascript code, split into a global.html page that ran in the background in its own context, and injected script files that were injected into the context of every accessible web page. Only global.html/global.js could interact with the larger Safari extension environment, and only the injected scripts could interact with the currently loaded web pages. These two separate worlds communicated with each other using message dispatches – global.html/global.js would push data to the injected scripts through safari.application.activeBrowserWindow.activeTab.page.dispatchMessage, while listening on safari.application.addEventListener for any messages coming back. Injected scripts would push data to the global page using the tab proxy safari.self.tab.dispatchMessage, and listen to messages from the global page using safari.self.addEventListener.

Safari App Extensions have a similar architecture. However, it has torn out the global.js/global.html portion of this, and replaced it with native code implemented in SafariExtensionHandler.

  • From SafariExtensionHandler:
    • Listen to messages from content scripts by implementing the method in SafariExtensionHandler: (void)messageReceivedWithName:(NSString *)messageName fromPage:(SFSafariPage *)page userInfo:(NSDictionary *)userInfo. The template project provides a skeleton for you. It ends up looking something like:
      - (void)messageReceivedWithName:(NSString *)messageName fromPage:(SFSafariPage *)page userInfo:(NSDictionary *)userInfo
      {
          // This method will be called when a content script provided by your extension calls safari.extension.dispatchMessage("message").
          [page getPagePropertiesWithCompletionHandler:^(SFSafariPageProperties *properties)
           {
               // NSLog(@"The extension received a message (%@) from a script injected into (%@) with userInfo (%@)", messageName, properties.url, userInfo);
               if ([messageName isEqualToString:@"command-from-content-script"]) {
                   // do things
                   NSDictionary *results = @{@"result" : @"Hello world", @"date" : [NSDate date]};
                   [page dispatchMessageToScriptWithName:@"command-done" userInfo:results];
               }
           }
           ];
      }
      
    • Dispatch messages to content scripts using: [page dispatchMessageToScriptWithName:@"messageNameHere" userInfo:....]where page is a SFSafariPage object that is either provided during a delegate callback, or retrievable using the SFSafariApplication class method + (void)getActiveWindowWithCompletionHandler:(void (^)(SFSafariWindow * _Nullable activeWindow))completionHandler;
      - (void)contextMenuItemSelectedWithCommand:(NSString *)command
                                          inPage:(SFSafariPage *)page userInfo:(NSDictionary *)userInfo
      {
          if ([command isEqualToString:@"contextmenu_1"]) {
              NSLog(@"contextmenu_1 invoked");
              [page dispatchMessageToScriptWithName:@"contextmenu_1_invoked" userInfo:@{@"result" : @"context_menu_1 works!"}];
          }
      }
      
  • From content script:
    • Listen to messages from the extension using safari.self.addEventListener, same as before.
    • Dispatch messages the global extension using: safari.extension.dispatchMessage
  • Apple documentation on App Extension message passing is reasonably good here

Do I really have to port all my global.js / background.js Javascript code to Swift / Objective-C?

As a test, I made a small Safari app extension using a fairly trivial global.js. The idea is that we embed a WKWebview instance inside the app extension, and have that WKWebview view act as a bridge between the old global.js and the new content script. The WKWebview loads the old global.html file, and shuttles calls from the injected script to the JS inside itself using evaluateJavascript, and then dispatches the evaluated results back to the content script.

For a trivial example, this approach seems to work — though I have not tested it extensively. I imagine for complex use cases though, the time spent re-building global.js to work inside a WKWebview is about the same (or more) than just rewriting it in Objective-C or Swift.

Injecting content scripts and stylesheets

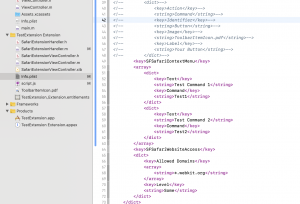
In legacy Safari extensions, the extension builder had a nice UI to add scripts and stylesheets for injection. For app extensions, plist XML will have to be specified manually (or using the built-in plist editor in Xcode)

        <key>SFSafariContentScript</key>
        <array>
	    <dict>
		 <key>Script</key>
		 <string>script.js</string>
	    </dict>
        </array>
        <key>SFSafariStyleSheet</key>
        <array>
            <dict>
                <key>Style Sheet</key>
                <string>injected.css</string>
            </dict>
        </array>

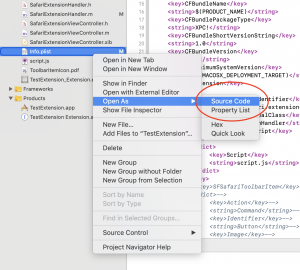
By using Open As -> Source Code, you can edit the XML directly if messing around with plist editor is not your thing. However, plists are a specific format, with arrays and dict representations that are annoying to write raw XML with, if not using a plist-aware editor.
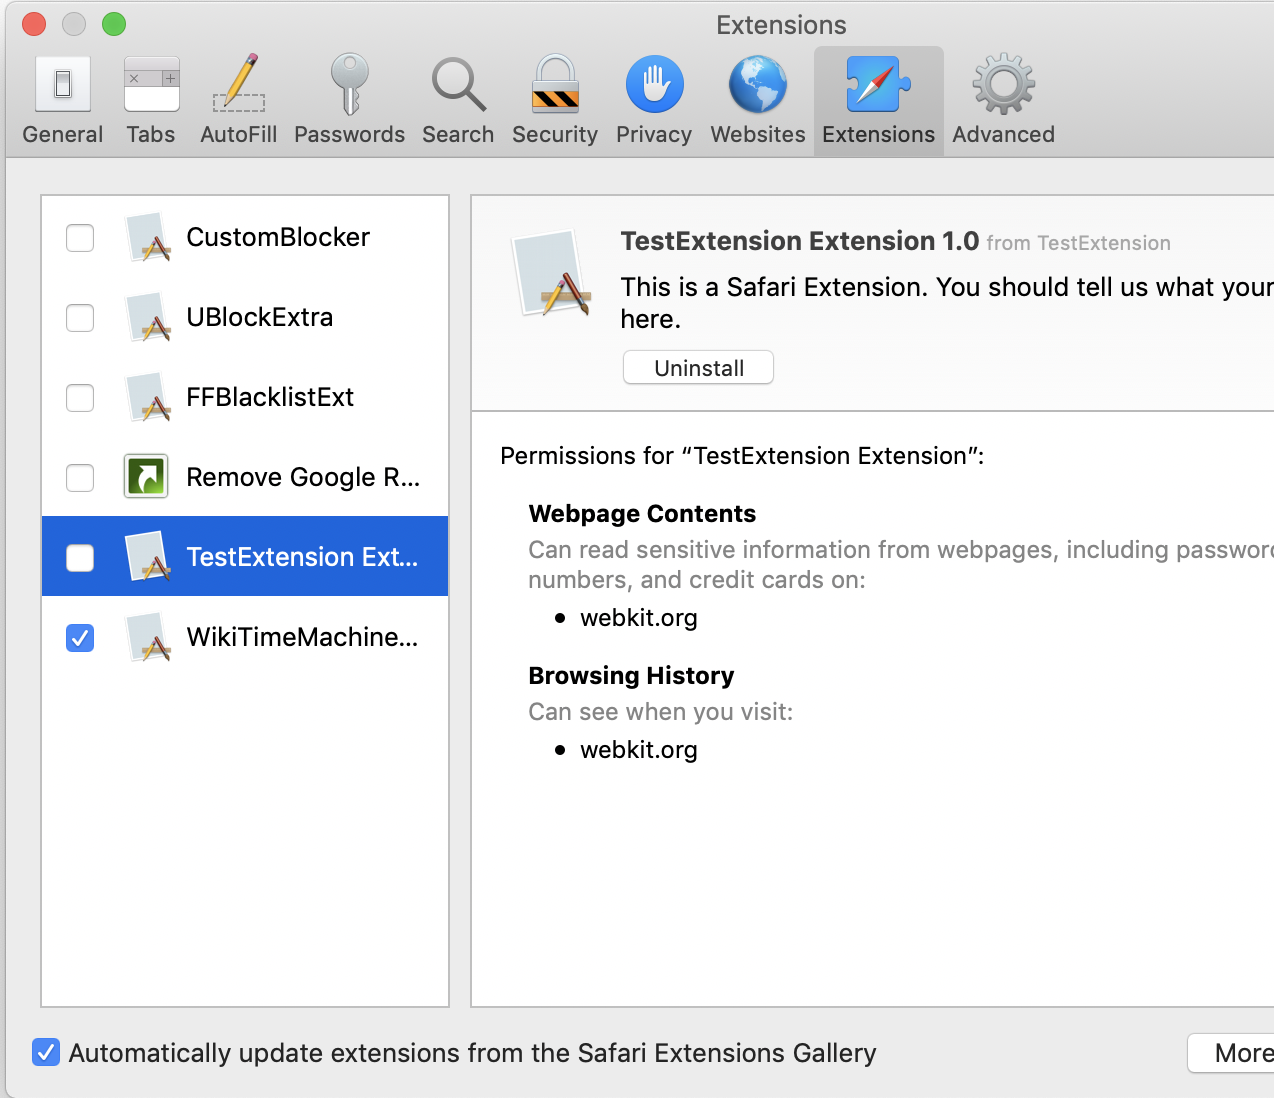
Context menus

Context menus have only changed a little from the legacy Safari extension architecture. You still specify context menus in the Info.plist, and they still interact largely the same way as in legacy extensions.

As of this post’s date, Apple’s porting guide states that “In a Safari App extension, there’s no validation of contextual menu items before the menu is displayed.” This is actually wrong. The API does provide for validation of contextual menu items before the menu is displayed.

In SafariExtensionHandler, implementing the validateContextMenuItemWithCommand method will let the extension decide whether to show or hide a context menu item, and whether to change its menu text depending on conditions.

- (void)validateContextMenuItemWithCommand:(NSString *)command
                                    inPage:(SFSafariPage *)page
                                  userInfo:(NSDictionary *)userInfo
                         validationHandler:(void (^)(BOOL shouldHide, NSString *text))validationHandler
{
    if ([command isEqualToString:@"Test1"]) {
        validationHandler(NO, @"Test1 nondefault text");
    } else if ([command isEqualToString:@"Test2"]) {
        validationHandler(YES, nil);
    }
}

As it suggests, validationHandler returns NO for shouldHide if the menu item should be displayed, or YES if it should be hidden. The text parameter allows for the menu text to be changed dynamically during validation.

What if we need to change which menu to show depending on if something exists on the web page or not? In the injected content script, listening to the “contextmenu” event and implementing a handler will allow you to populate userInfo dictionary with data, and validateContextMenuItemWithCommand will be called with that data.

function handleContextMenu(event)
{
    var data = {};
    // do some work and populate data
    safari.extension.setContextMenuEventUserInfo(event, data);

}

document.addEventListener("DOMContentLoaded", function(event) {
    document.addEventListener("contextmenu", handleContextMenu, false);

});

Handling the actual context command, once invoked by the user, requires implementing the method - (void)contextMenuItemSelectedWithCommand:(NSString *)command
inPage:(SFSafariPage *)page userInfo:(NSDictionary *)userInfo

The code is again very similar to how validation is done.

Toolbar: Buttons and Popovers

Safari App Extensions appear to be limited to a single toolbar button. Safari App Extensions cannot provide full toolbars (called “extension bars”, previously), like legacy extensions could.

The toolbar button can be configured to trigger one of two actions: Command which invokes a command immediately, or Popover which creates the popover view as provided by SafariExtensionViewController. The “menu” action that legacy Safari Extensions had, which simply created a menu of commands to choose from, has been removed. See the guide on Toolbar Item Keys.

To respond to a toolbar button click, implement - (void)toolbarItemClickedInWindow:(SFSafariWindow *)window in SafariExtensionHandler.

To show a popover on click, implement - (SFSafariExtensionViewController *)popoverViewController. This should be part of the boilerplate code generated by XCode.

Popovers are no longer HTML pages. They are now native AppKit views, created the same way as any macOS app’s views; legacy popovers would have to be ported to native code, or hacked using a WebView. The UI controls available to the popover are native macOS controls (NSButton, NSTextField, etc.), and must be created and styled using Interface Builder (or programmatically). These UI elements can be wired up to the SafariExtensionViewController singleton, which can provide the delegate methods to respond as the controls are changed.

Notes and references

Converting a Legacy Safari Extension to a Safari App Extension — As of the time of this post, there is a heading in this brief Apple document called “Convert Legacy Safari Extensions Automatically”. You might imagine that this implies there is some kind of tool that automatically converts legacy extensions into app extensions, but this is not the case. That section actually describes how you can uninstall a previous legacy Safari extension in favor of an updated app extension (that you still have to write, yourself, manually). So the “two options” that they mention is actually just one option, with a preface of how to remove a previous version of the extension written in legacy/JS form.

Safari App Extension Guide

Safari App Extension Property List Keys

Resolving endless Apple Pay add card loop after Time Machine restore

UPDATE:

There appears to be a new directory at /private/var/db/applepay/Library/NFStorage in later versions of macOS. This directory may have to be cleared as well. YMMV.

Original:

If you recently had your Macbook Pro (Touch Bar) repaired (possibly with a logic board replacement), and restored from Time Machine backup, you might find yourself unable to use Apple Pay on Mac OS 10.12.5. The system will report “Apple Pay is already configured on this disk for another Mac” and ask you to “Reset Apple Pay and Add Card”. If you try to do so by authorizing it using fingerprint or password, it will immediately drop you back to the original “Apple Pay is already configured on this disk for another Mac” prompt, going back into this cycle ad infinitum.

The issue is that there is an Apple Pay cache at /private/var/db/applepay/ on the system that has been invalidated, but it seems to be unable to delete this cache properly. It will keep trying to refresh this cached data, and fail to do so.

There is a workaround for this. Obligatory warning: THIS IS MESSING WITH SYSTEM FILES. DO NOT EXECUTE ANY OF THIS IF YOU ARE NOT SURE WHAT YOU ARE DOING AND DO NOT HAVE A BACKUP OF YOUR DATA. TYPING THE COMMANDS WRONG MAY CAUSE SERIOUS ISSUES WITH YOUR MAC.

I used this process myself to good success under 10.12.5, on my Macbook Pro. YMMV if you decide to try this on any other version of Mac OS.

To fix this endless loop, you need to first clear out all the files (but not the folders) inside /private/var/db/applepay/. Open Terminal.app and enter the following commands:

# get a root shell
sudo -s
# move the stale files away
mv /private/var/db/applepay/Library/Caches/* ~/.Trash/
mv /private/var/db/applepay/Library/Preferences/* ~/.Trash/
# kill the related cache servers
pkill seld; pkill nfcd;

Then:
– Wait a few seconds for the relevant servers to boot themselves up again. Then, go back to System Preferences, hit Add Card…

– It will fail the first time with a mysterious error. That’s fine. Hit Add Card again…

– On this second try, it will say “Apple Pay is already configured on this disk for another Mac”.

– When you hit “Reset Apple Pay and Add Card” for the final time, it will actually break past the loop, and you will get to re-enter your Apple Pay card information without further issue.

It’s a relatively easy fix, so I imagine the next OS version will have addressed this problem in a more elegant way.

check progress of photoanalysisd

If you’ve just installed Mac OS Sierra and now see photoanalysisd sucking 100% to 200% CPU power, this process is doing some kind of face detection + object / image recognition / indexing on your Photos library.

photoanalysisd progress

Open Photos.app, select People on the left sidebar, and see how far it’s gotten in this task. If you have a very large Photos library, this might take a while.

As a bonus, while Photos.app is open, photoanalysisd is suspended, allowing your laptop fans a bit of a rest.

It’s all for a good cause. After indexing, you’d be able to type “ocean” in the search box and get all your photos with the ocean in it, without having to tediously tag all your photos yourself. Magical, huh? ( Not really. If this is doing what I think it’s doing, well, it’s the kind of problem computer vision researchers have been tackling – and solving – for years already.).

As an aside, for consumer-grade apps like Photos, arguments have been made to do computationally intensive image analysis in The Cloud(tm) instead of on client machines. The tradeoff is fairly obvious. In exchange for the privacy benefit of Apple not uploading color histograms of all your photos to its own cloud servers (something I’m sure Google wouldn’t bat an eyelash at doing), you’ll have to pay the cost of doing this analysis yourself, with your own measly consumer/mobile-grade CPUs (which isn’t ideal if you want to get work done at the same time that this analysis is going on). Overall, the user experience probably could have been handled better, especially given the extensive public beta period that Sierra received. The current opaque process violates some core UX principles: giving users (at least the feeling of) control, and giving the user clear reasons to trust in the importance of the task being performed. Apple should have known that eating 100% CPU while people are actively working with their machines is immediately noticeable, and should have 1) let the user know that image analysis is about to happen, and 2) given them the option of choosing when and how much CPU to devote to this task.

Outlook 2011 for Mac still adding arbitrary line breaks into plaintext emails

Outlook 2011 on Mac OS X, v14.1.3, for whatever reason, still does not properly support “format=flowed” content-type or “quoted-printable” extensions for plaintext emails. This causes plaintext emails to be sent as mangled messes, full of arbitrarily inserted linebreaks. This appears to be a regression from Entourage, as far as I recall, which never handled plaintext quite this badly, and this is also despite Microsoft’s promises to have “implemented format=flowed”.

This is the last straw. I’ve been a loyal MS Entourage / MS Outlook user since the days of Outlook Express for Mac and Office 2001. But at this point, this software has actively impeded my communications with my friends and colleagues. We’re done.

The Problem

Here’s a really simple illustration of the problem, from the receiver’s end:

See how the URL, which was composed as one plaintext line, gets split up into two lines?

Here is another example, purely from the editor UI (and not even being sent yet). I start with a perfectly good reply saved as a draft:

I make a small wording change and resave:

See that third line? Thanks to the hard line breaks inserted by Outlook (even at composition stage), the line wrap has been mangled. This draft has to be re-wrapped manually, by the tedious process of deleting the newline-based hard line breaks from every line following in the paragraph. That was a short paragraph. Imagine doing that in a long paragraph, from the first line.

To add insult to injury, there is not even a “re-wrap” functionality in the editor, to at least solve this user-interface level problem (as opposed to the protocol level problem). Obviously no one at Microsoft sends plaintext emails anymore.

The Issue

Back when email was first devised, servers didn’t have a lot of memory, and people had pretty tiny terminals with fixed line widths and not a whole lot of processing power to deal with it. The Internet standards for email messages http://www.ietf.org/rfc/rfc2822.txt, RFC2822 Section 2.1.1, defines recommendations for email body text transferred over SMTP:

There are two limits that this standard places on the number of
characters in a line. Each line of characters MUST be no more than
998 characters, and SHOULD be no more than 78 characters, excluding
the CRLF.

The 998 character limit is due to limitations in many implementations
which send, receive, or store Internet Message Format messages that
simply cannot handle more than 998 characters on a line. Receiving
implementations would do well to handle an arbitrarily large number
of characters in a line for robustness sake…

The more conservative 78 character recommendation is to accommodate
the many implementations of user interfaces that display these
messages which may truncate, or disastrously wrap, the display of
more than 78 characters per line…

…it is encumbant upon implementations which display messages
to handle an arbitrarily large number of characters in a line
(certainly at least up to the 998 character limit) for the sake of
robustness.

Basically, the SMTP server can count on messages that come in 80 characters per line (and always less than 1000 characters per line), and email clients can trust that they only have to render up to the 78th column of text. This limitation is hardly useful in the modern age, but persists since it’s part of the standard. And it’s a fine, conservative design model. But now we write some pretty long lines without linebreaking ourselves, so something magical has to happen in the email client itself, like Outlook 2011.

The naive solution, of course, is to slap arbitrary line breaks into the user’s email message at every 78 characters, which is what ye olde email clients (looking at you, pine — how did I ever put up with you…) from yesteryears did (and Outlook 2011 still does). It’s a matter of personal preference whether this is a reasonable solution. Proponents argue that the email will “always look the same” on all devices, including those limited to 78 chars per line.

I (and many others), on the other hand, think the spirit of the RFC is to allow the actual handling client to decide where to break lines. With the exception of source code, it is almost always better for the email client to use the full width of their display, however many characters that might be. Even in the case of source code, it should also not be mangled by the insertion of arbitrary line breaks in them — what if newlines are meaningful in this language, and the author used more than 78 characters per line? The example with the URI is illustrative of this problem — the URI got an arbitrary newline in the middle, destroying its meaning. Users who copy-paste the two lines will end up getting a 404, due to that stupid inserted newline in the middle of it. This should not be allowed to happen.

Because this naive solution was not perfect, an extension was proposed as RFC 2646. This format of email is characterized by the content-type:

Content-type: text/plain; charset=US-ASCII; format=flowed

In format=flowed emails, the sending and receiving email clients are allowed to reflow the text based on user linebreaks. It follows some simple reflowing rules, but in short it will preserve user-inserted hard line breaks while adjusting the rest of the message for the proper line length while the message is “on the wire”, and recombining the lines on receipt and display. Modern email clients like Thunderbird, designed for user comfort and the generous system limitations of the year 2011, implement this standard.

Guess what format Outlook 2011 sends?

Content-type: text/plain; charset="US-ASCII"

Not even an option to change that behavior. It does not appear that Outlook 2011 deals with any of this. It just inserts some line breaks and calls it a day.

An alternative, implemented by Apple’s Mail.app, is to send messages with the Content-Transfer-Encoding header set to “quoted-printable”, as per RFC 2045. In this model, soft line breaks are sent explicitly with the character “=” representing it, breaking at the usual 70-odd character column. On the receiving end, the client processes this character as a no-op and concats the line back together for display.

Outlook doesn’t do that either. It just wants to mangle your emails.

Conclusion

The world moved on and adopted HTML emails, which doesn’t have this newline problem. For those of us who do think HTML emails are an atrocity to be used sparingly, if at all, the idiosyncrasies of plaintext email have to be addressed. Outlook 2011 appears to do even worse than Entourage 2008 at this problem, by not dealing with it at all. And apparently getting a bunch of Microsoft “MVPs” on their forums to cloud the issue with promises of support and unrelated commentary.

Given the sad state of email clients on the Mac, I believe Thunderbird is now my only option for sane plaintext messaging.

A wishlist for a native Mac email client

As the tech-savvy sort, I often do some things that the typical consumer might not care about. However, it is strange that I simply cannot find a native Mac email client on the market that fulfills what I consider to be very basic features for decent email management. While everyone is gushing over the latest social network to be jammed into an email client, I just want my email to work in a sane way.

The features I’m looking for:

  • POP3/IMAP + SSL support
  • Full-text search, or indexable by OS X’s Spotlight
  • Multiple account support
  • Archival — if I delete an email account, it should not wipe out all emails from local storage that belonged to this account, especially if said account was POP3
  • Plaintext composition — I’m taking the side of format=flowed in plaintext composition. Manually formatting hard line breaks at char 78 is an insane holdover from a bygone age when dumb ASCII terminals were still the primary user interface. At least allow this as an option, or support the quoted-printable content type and soft line-breaks during composition.
  • Filtering rules — Basic filters that let me decide where to put messages based on mail headers and subject is enough
  • mbox import/export — I need to be able to import mail from my previous client. Similarly, in the scenario that this app is no longer supported, I need the option of moving to another client.
  • Bonus: auto-bcc to an arbitrary email address — I’ve never solved my problem with archiving sent mail. All you really need to do is auto-populate the BCC field on any “New Mail” composition window with this address. That’s all I really need to be happy here.

Amazingly enough, there is not a single Mac mail client that fulfills all of these basic conditions. Especially egregious problems for the top three mail clients:

  • Microsoft Outlook Mac 2011 — mangles all outgoing plaintext emails by inserting hard line breaks. No support for flowed plaintext, despite promises to the contrary, and no support for quoted-printable content-type and soft line breaks. No provision for auto-bcc.
  • Apple Mail (Snow Leopard) — deleting an old email account deletes ALL mail belonging to this account, even for downloaded POP3 mail. WTF. Can only auto-bcc “myself”, which is a fixed email address corresponding to the sending account; if you allow autobcc, why not let the user pick the email to autobcc to?
  • Mozilla Thunderbird 8 — deleting an account deletes all downloaded mail belonging to this account, unless messages are stored to the “local folder” rather than its inbox abstractions.

For fear of accidental data loss, I’ve stuck to the Microsoft offering, despite its incredible inability to keep plaintext mail intact. The newer social clients are all Thunderbird-based and leave little else worth examining — they seem far more interested in integrating ever more social network APIs than to support more basic email features. The rest of my friends are all sworn Gmail webmail users and think I’m a strange luddite for even considering native clients. I’ll leave the webmail vs native client debate for fear of going on a page-long rant; suffice to say that the user experience between the two options is not comparable at all.

It almost makes me want to start writing a new email client for myself, or hire someone to start some skeleton code at least, because obviously no one else is going to scratch this itch of mine. That kind of spare time and money, however, would probably never come unless I manage to actually sell a company or two (rather than just founding unsuccessful ones).

fixing a scrambled IPython command history on stock OS X 10.6

So I started over with a fresh install of OS X 10.6 recently, and wanted to restore my Python development environment. In doing so, IPython is absolutely essential if you want a sane interpreter environment to test out code. I had a bit of trouble with it though.

The Problem

The stock Python 2.6 shipped with OS X 10.6 Snow Leopard has a readline module linked to libedit, the BSD alternative to the GPL’ed readline. The readline module, if you are not aware, is (among other things) responsible for keeping command history in the IPython interpreter. This causes command history in the IPython 0.10 interpreter to behave in very odd ways. When backtracking through the command history buffer using the up-arrow key, for example, the previous command is only partially recalled, and appears completely scrambled. Indents, too, seem off — in a whitespace-sensitive language like Python, this is annoying. (See first figure)

IPython command interpreter is broken when using libedit with command history

Fixing IPython’s bugs are beyond my ability. While I certainly don’t want to delve into the quagmire that is GPL vs BSD licensing, I do understand why Apple would want to avoid the viral nature of the GPL and ship libedit instead. However, using a genuine Readline library is going to be the best recourse for this problem. I already have a copy of readline compiled and ready to go, and just need a new version of readline.so, the library that links Python to readline.

The easy solution

Sifting through my records, I came across a SelfSolved problem record from my good friend Hannes who had issues with his IPython command history.

The solution: sudo easy_install readline, which uses setuptools to install a precompiled package of readline.so statically linked to genuine GNU readline. Restart your IPython console and everything should work. (See second figure)

IPython with readline

The hard solution

Being the inquisitive sort, I also wondered how I would be able to reproduce this work from scratch. readline.so ships with the Python source package, but surely I would not be required to compile a whole new copy of Python for one measly module library?

I documented this process in SelfSolved again: building readline.so for Python. At some point I should write an interface between SelfSolved and WordPress so that I don’t have to reproduce a lot of my work here manually.

Compiling readline.so

This is actually fairly easy.

  1. Get a copy of the Python source code. In OS X 10.6, it ships with Python 2.6.1.
  2. Unpack it and go into its directory. You should find a Modules subdirectory. In it is readline.c, the source file for readline.so.
  3. Compile the source file. The appropriate incantation is:
    gcc -O2 -arch x86_64 -arch i386 -shared -o readline.so readline.c -I/usr/local/include -I/System/Library/Frameworks/Python.framework/Versions/2.6/include/python2.6 -L/usr/local/lib -lreadline -ltermcap -framework Python

    where the -arch flags should be whatever processors you wish to support, the -I arguments should point to the directories that contain header files for the readline library and the Python framework, and the -L argument should point to the path for the readline library. Use whatever optimization flags you feel comfortable with, instead of -O2, if you wish.

Replacing readline.so

So now we have a readline.so that’s properly linked to readline.dylib. The thornier question is how to override the system-provided readline.so. The system version is located at /System/Library/Frameworks/Python.framework/Versions/2.6/lib/python2.6/lib-dynload/readline.so, and the naive would simply overwrite it with their new readline.so. This is a bad idea.

As I have mentioned in the past, overwriting system libraries in OS X is an unhealthy thing to do. The problem is that Apple furnishes no official package management system — anything you personally change is considered fair game for the next official system update. On the next system update, if the Python component is affected by the update, the Apple updater will happily clobber your compiled files with its own, leaving you suddenly back at square one. You don’t know how many times I’ve had to recompile emacs (for X11 support) on OS X 10.4 because of this little annoyance. Leave things in the /System/Library directory hierarchy alone, for your own sanity.

However, in this case /System/Library/Frameworks/Python.framework/Versions/2.6/lib/python2.6/lib-dynload comes ahead of the user-modifiable /Library/Python/2.6/site-packages directory on Python’s sys.path. So if you just drop readline.so into site-packages, the system version still takes priority.

There are a few ways to do this. For one, you can create a sitecustomize.py in /Library/Python2.6/site-packages. In this file, arbitrary Python statements can be written, and the interpreter will automatically execute them at runtime. So, you can add a sys.path = ["/dir/here"] + sys.path statement and point it to a directory containing your readline.so file. Alternatively, you can abuse the technique used in the easy_install.pth file. It turns out that if you ever used easy_install, directories pointed to by the easy_install.pth file takes priority over the system paths. They use an interesting way to accomplish this, which you can copy. Or, you can just insert your directory containing readline.so into easy_install.pth. In any case, this will force the readline-based readline.so to take precedence over the libedit-based readline.so, without overwriting anything.

Discussion

So for any sane person, the easy solution should be enough. For the rest, the hard solution is an interesting exploration of how some of Python’s built-in modules can be compiled and inserted individually.

Subversion 1.6.2 runtime error on network access on OS X 10.5

A new SelfSolved solution is up for perusal. The problem I tried to solve:

After compiling Subversion 1.6.2 from source on OS X 10.5 Leopard, the compilation is apparently successful, but svn dies when it tries to connect to the network for the first time. Crash log reports that symbols are missing from libneon.dylib.

Crash report from shell:

dyld: lazy symbol binding failed: Symbol not found: _ne_set_connect_timeout
Referenced from: /usr/local/lib/libsvn_ra_neon-1.0.dylib
Expected in: dynamic lookup

dyld: Symbol not found: _ne_set_connect_timeout
Referenced from: /usr/local/lib/libsvn_ra_neon-1.0.dylib
Expected in: dynamic lookup

Check out the places that I googled and my final solution writeup … at SelfSolved #49: Subversion 1.6.2 explodes on first network access.

The problem is very similar to a previous compilation issue I solved for PHP. In essence, the -L library search path passed to GCC at compilation time has /usr/lib in front of everything else. This means whatever library path you might have given to it at configure time, it’ll always look for the library in /usr/lib first, picking up the old system libneon in the process. Since the bad libneon dynamically linked, the problem doesn’t manifest itself until runtime — and only at runtime with network access involved.

As with the PHP issue, change the very first -L/usr/lib to -L/usr/local/lib (or wherever your newer libneon is located), and it’ll link correctly.

Out of curiosity, I checked MacPorts first. The MacPorts solution of disabling libneon version checking is odd — it also works, but I dunno if it’s linking to the right thing or not.

SSH, Subversion through SOCKS proxy on Mac OS X

UPDATE Apr 2, 2012
Due to the complete lack of updates for tsocks, I recommend the use of proxychains over tsocks. It accomplishes the same thing but works out of the box.

One persistent problem that I run into is that I need to access certain network resources through a SOCKS proxy server. This is all well and good if they are web resources — Safari, Firefox, etc. support SOCKS proxies quite well. However, I also need, for example, SSH and Subversion access to some resources. SOCKS support is woefully inadequate or nonexistent in these tools.

In the case of SSH, even if you google for this, you’ll run through thousands of examples of using ssh as a SOCKS server, but not through one as a SOCKS client. There are some convoluted solutions, but none of them I can use directly on an OS X 10.5 machine.

TSocks: the solution…if it were that easy

Now, tsocks is a nifty little tool to transparently divert network calls through a SOCKS 4 or SOCKS 5 proxy. This allows even non-SOCKS-aware applications to function through a SOCKS server.

Unfortunately it is very old, unmaintained code (1.8 beta 5 was released in 2002). It doesn’t compile cleanly on OS X due to this, nor will it compile under GCC 4.x. Further, it won’t work out of the box either if you do manage to compile it. The problem is that it relies on the Linux-only LD_PRELOAD functionality to use a shared library to hijack network system calls. This mechanism is called DYLD_INSERT_LIBRARIES on OS X and only works if DYLD_FORCE_FLAT_NAMESPACES is active.

Getting a working tsocks: MacPorts

There is an easy way to get tsocks. MacPorts ships a ported tsocks package. If you use MacPorts, sudo port install tsocks should do it.

Unfortunately on several machines I don’t use MacPorts, and don’t want to pull down an entire third-party package manager with its own library tree on each of these boxes. So I have do to this the hard way.

Getting a working tsocks: rolling my own

First to notice is that there are two tsocks distributions. One is the original tsocks 1.8b5, last updated in the first half of this decade. To make it work, follow the instructions provided by Marc Abramowitz in 2006. Note that his patch is actually located at his new domain address instead of the old, linked one.

The MacPorts distribution, on the other hand, is based on R. Garcia’s patched tsocks distribution, incorporating some modernization and new features by the Tor team. This distribution is numbered 1.8.x, with the last being 1.8.4. Unfortunately it is also no longer maintained, as the Tor devs forked this into a custom version to use with the Tor network only. Unfortunate, but for now, it still compiles, and works a bit better than the 2002 original.

To roll your own tsocks via source out of the MacPorts distribution, you will want the patches from the MacPorts repository. An outline of the compilation procedure:

  1. Download tsocks 1.8.4 from the author’s page
  2. Download all the patches from the MacPorts repository
  3. Concatenate all of the patches together:
    cat patch-* > tsocks.osx.patch
  4. Put the concatenated tsocks.osx.patch file into the tsocks source directory. Apply the patches:
    patch -p0 < tsocks.osx.patch
  5. Regenerate the configure script:
    autoreconf
  6. Configure the package:
    ./configure --prefix=/usr/local --bindir=/usr/local/bin --mandir=/usr/local/man --sysconfdir=/etc --libdir=/usr/local/lib
  7. Install the library and binaries:
    sudo make install
  8. Install the conf file:
    sudo cp ./tsocks.conf.complex.example /etc/tsocks.conf
  9. Edit the conf file. Make sure that if you’re not using tor, that you write in the conf file
    tordns_enable = false

Configuring tsocks

The complex configuration file example should have explained all of the features to be set. For my configuration:

Some important settings:

  • local – this setting, in the format of IP/netmask can be repeated several times, each time to exclude a set of IPs from being diverted to the SOCKS server. For obvious reasons, your SOCKS server will have to exist in one of these excluded IP ranges – otherwise you will never even reach your proxy server.
  • server and server_port – these should point to the IP address and port of your SOCKS server
  • server_typetsocks defaults to SOCKS4 mode. You may wish to set it to 5 for SOCKS5 usage.
  • tordns_enable – this needs to be set as false if you don’t use Tor.

Using tsocks

Once this is set up, simply prefixing the network command you want to run with tsocks will force a diversion through the proxy connection. For example:

tsocks ssh example.com

The same can be applied to Subversion.

tsocks svn update

will force the svn client to act through the proxy set in tsocks.conf.

SOCKS on localhost

Note that SOCKS services on 127.0.0.1 has a minor gotcha. Sometimes, you are able to SSH into a remote machine, and use that connection as your SOCKS server. This is described in my post about using SSH as a pseudo-VPN, which describes the -D switch. My use case here is that once you do this, all further local SSH connections to other machines should be diverted through the first SSH. For example, I’d like to do:

my-machine$ ssh -D 40000 gateway.example.com # establish a SOCKS server on localhost:40000 to the gateway host

and then:

my-machine$ ssh lan-1.example.com # access the protected lan-1 machine through the SOCKS, which will see me as gateway.example.com 

This is very doable in the tsocks setup if you set tsocks.conf:

server = 127.0.0.1/255.255.255.255
server_port = 40000

and then:

my-machine$ ssh -D 40000 gateway.example.com
my-machine$ tsocks ssh lan-1.example.com

This is the gotcha: make sure the netmask is set correctly to 255.255.255.255. Otherwise tsocks will die with a cryptic:

IP (127.0.0.1) & SUBNET (0.0.0.0) != IP on line 22 in configuration file, ignored

It is apparently fairly sensitive about the subnet mask setup to conform to exact standards.

With this tsocks setup, you won’t have to create special VPNs to lock a LAN machine behind a gateway. As long as you can SSH into the gateway machine from your local machine, you can access the resources behind it with any application on your local machine via tsocks. Nifty, huh?

Fixing undefined library symbols for compiling PHP 5.2.8

So while compiling PHP 5.2.8 on OS X 10.5, you might run into something like:

Undefined symbols for architecture i386:
  "_xmlTextReaderSchemaValidate", referenced from:
      _zim_xmlreader_setSchema in php_xmlreader.o
  "_xmlTextReaderSetup", referenced from:
      _zim_xmlreader_XML in php_xmlreader.o
ld: symbol(s) not found for architecture i386
collect2: ld returned 1 exit status
Undefined symbols for architecture x86_64:
  "_xmlTextReaderSchemaValidate", referenced from:
      _zim_xmlreader_setSchema in php_xmlreader.o
  "_xmlTextReaderSetup", referenced from:
      _zim_xmlreader_XML in php_xmlreader.o
ld: symbol(s) not found for architecture x86_64

This doesn’t only happen with libxml. If you’ve installed any extra updated libraries, like iconv or tidy or any library that has significant symbol changes between versions, it’ll die in similar ways. The MacPorts folks have encounted similar issues in ticket 15891, but WONTFIX‘ed the issue. Apparently the PHP devs are also punting on the problem.

The immediate cause is that you have multiple versions of some shared libraries. For example, in the case above, I have two libxml versions — one in /usr/lib, and another in /usr/local/lib. This is because I do not want to overwrite the Apple-provided libxml version, but still needed new features provided in later libxml versions. The arrangement works fine in every other software compile except this one, so I investigated further.

The root of the problem

Despite the developers’ airy dismissal of the issue, the underlying problem is indeed that the Makefile generated by PHP at configure time is slightly broken. In Makefile and Makefile.global, you’re going to see this line:

libs/libphp$(PHP_MAJOR_VERSION).bundle: $(PHP_GLOBAL_OBJS) $(PHP_SAPI_OBJS)
        $(CC) $(MH_BUNDLE_FLAGS) $(CFLAGS_CLEAN) $(EXTRA_CFLAGS) $(LDFLAGS) $(EXTRA_LDFLAGS) $(PHP_GLOBAL_OBJS:.lo=.o) $(PHP_SAPI_OBJS:.lo=.o) $(PHP_FRAMEWORKS) $(EXTRA_LIBS) $(ZEND_EXTRA_LIBS) -o $@ && cp $@ libs/libphp$(PHP_MAJOR_VERSION).so

where $MH_BUNDLE_FLAGS is usually defined as something like

MH_BUNDLE_FLAGS = -bundle -bundle_loader /usr/sbin/httpd -L/usr/lib \
 -L/usr/lib -laprutil-1 -lsqlite3 -lexpat -liconv -L/usr/lib -lapr-1 -lpthread

The problem is that this hardcodes the search paths for linking shared libraries. GCC searches for shared libraries to link in the order of the provided -L paths. In this case, MH_BUNDLE_FLAGS is expanded immediately after $CC — so the load order is:

  1. /usr/lib
  2. /usr/lib (these are redundant, and so will probably be collapsed into one path)
  3. …every other custom library path you specify

Now you see the issue. No matter what your library paths are set to, the PHP compilation system will insist that whatever shared libraries in /usr/lib take precedence. Therefore, even if you specified that another version (say, libxml.dylib in /usr/local/lib) should be used instead, the invocation to link against -lxml2 will search in /usr/lib first. And since it finds the old version, which may be missing a number of symbols, the compilation blows up right there.

Evidence

And indeed, if you look at the (rather long and massive) compilation/link command right before it fails, you’ll see:

gcc -bundle -bundle_loader /usr/sbin/httpd -L/usr/lib -L/usr/lib \
-laprutil-1 -lsqlite3 -lexpat  -liconv -L/usr/lib -lapr-1 -lpthread -O2 -I/usr/include -DZTS   \
-arch i386 -arch x86_64 -L/usr/local/lib ... 

emphasis mine, where /usr/local/lib might be /opt/lib or whatever custom path you provided to configure.

Solutions

The trivial solution is to manually invoke that last line of compilation, but swapping the -L load paths.

gcc -bundle -bundle_loader /usr/sbin/httpd -L/usr/local/lib -L/usr/lib \
-L/usr/lib -laprutil-1 -lsqlite3 -lexpat  -liconv -L/usr/lib -lapr-1 -lpthread -O2 -I/usr/include -DZTS   \
-arch i386 -arch x86_64  ... 

This is easy to do and takes just a second.

Another possible solution is to patch the Makefile, such that MH_BUNDLE_FLAGS comes later in the compilation line:

libs/libphp$(PHP_MAJOR_VERSION).bundle: $(PHP_GLOBAL_OBJS) $(PHP_SAPI_OBJS)
        $(CC) $(CFLAGS_CLEAN) $(EXTRA_CFLAGS) $(LDFLAGS) $(EXTRA_LDFLAGS) $(PHP_GLOBAL_OBJS:.lo=.o) $(PHP_SAPI_OBJS:.lo=.o) $(PHP_FRAMEWORKS) $(EXTRA_LIBS) $(ZEND_EXTRA_LIBS) $(MH_BUNDLE_FLAGS) -o $@ && cp $@ libs/libphp$(PHP_MAJOR_VERSION).so

This will force your library paths to be searched before /usr/lib, thus resolving the link problem.

update 7/18/09
An anonymous reader mentions that you could also specify the right libxml by full path, instead of letting it use -lxml. Basically, in the last compilation line, you would remove any mentions of -lxml and replace that with the full path to your library e.g. /usr/local/lib/libxml.dylib. In fact, this is probably the way that has the least possible side-effects, since you aren’t changing the search order for any other libraries.

Discussion

This is not the first time that PHP core developers have refused to fix a compilation issue that is arguably preventable through actual testing under different installation scenarios. This is an “edgier” edge case than the tidy.h issue, but still should be fairly noticeable for a substantial number of people.

The “You should only have one library installed” argument is, to be honest, unnecessarily arrogant (sadly, not as a rare a problem as you’d like in some open source development projects ). I understand that it’s an open source project, and no self-respecting software engineer likes to use time on project plumbing / build systems rather than work on the product. However, on OS X, due to the lack of official Apple package management systems, no one should be overwriting system default libraries — down that way lies insanity, especially at every system or security update. PHP’s build system is obviously broken any time there is a substantial difference between user-installed libraries and system libraries. This bad behavior is especially egregious, because the configure command allows you specify your own library path — misleading users into thinking that the path they specified would be obeyed at compile time. If you only intend for the system library to be used and no other, perhaps the configure script should auto-detect this on OS X and disable that command-line option. Basic user interface design should apply even to command-line interfaces.

Note that changing link ordering may have some unforseen consequences, since the devs obviously never tested this path. For example, you should make sure the dynamic libraries are loaded in the right order at runtime. On OS X, the load path is typically hard-coded into the dylib, so usually there won’t be a problem — but there may be edge cases. Test your build (and any PHP extensions you built) before using it in production!