macOS “Optimized Battery Charging” in Windows 10 / Boot Camp causes MacBook Pro battery to not charge

On a MacBook Pro 16-inch 2019 (Intel), under macOS Ventura 13.1, if

  • the “Optimized Battery Charging” option is turned on in System Settings -> Battery
  • the power adapter is plugged in
  • the battery has charged to 80% or more under macOS
  • the machine is then rebooted into Windows 10, using Boot Camp
  • then: in Windows, the battery will not charge at all. Windows will report the battery as “Plugged in” but the battery will not charge. The battery will slowly drain to 0% as the machine is used.

Solution

Disable Optimized Battery Charging temporarily or permanently before rebooting into Windows 10 under Boot Camp, in System Settings -> Battery -> Battery Health -> Info disclosure

Discussion

Optimized Battery Charging is a new feature introduced in recent macOS versions to preserve the health of Intel MacBook Pro batteries. It is known that if a laptop is not being used on battery, then it is best to charge to 80% instead of full. macOS purports to learn its user’s laptop battery usage patterns, and will charge the battery to 80% under normal adapter usage, and only begins charging to full when it expects the user to go to battery power soon.

However, it seems to do this by instructing some SMC/firmware level controller to stop charging the battery once current capacity hits 80% or more. When rebooted into Windows 10, which does not understand this optimized charging feature, there is no corresponding instruction to begin charging the battery again when the capacity falls below 80%. The consequence is that the laptop battery will steadily drain to 0%, and nothing will make it charge again until the machine is rebooted back into macOS.

This is an understandable edge case that Apple engineers didn’t test for. However, it seems to have started only recently (I don’t recall macOS Monterey having this behavior). Until it is fixed, if regular Windows 10 / Boot Camp usage is expected, it is best to leave the Optimized Battery Charging feature turned off on the macOS side — temporarily or permanently.

Worth noting that there are multiple other possible reasons that Windows 10 / Boot Camp is causing battery drain on a MacBook Pro. For example, the 16-inch 2019 MBP’s white 96W USB-C charger looks identical to the 87W USB-C charger from previous-gen MacBook Pro 15. If mistakenly or deliberately used to power the 16-inch MBP, then under full load the 87W adapter is insufficient to run the laptop. In this scenario the OS will tap the battery in complement with the adapter, causing a steady drain. Windows also runs more inefficiently than macOS on MacBook Pro, so under full CPU/GPU usage, it seems to take more power sometimes than even the 96W adapter can provide.

However, in either of those cases, the drain is very slow. In the case of the Optimized Battery Charging bug described above, under full CPU/GPU usage, the battery drains extremely quickly, with 30 minutes of usage causing 50% or more battery drain sometimes. This is because in this case, the laptop is not drawing power from the adapter at all.

Using Netgear R7800 with Hurricane Electric 6in4 Tunnel

Despite living in the SF Bay Area, nominally the tech capital of the US, my previous ISP did not support IPv6. Thus, my fallback method was to use a tunnel broker to access IPv6 servers. Namely, I opted to use Hurricane Electric’s tunnelbroker.net IPv6 tunnel.

It turns out that my Netgear Nighthawk X4S R7800 router (which itself was a replacement of a previous Netgear R7800 — long story with Asurion warranty insurance for another day) does not support 6in4 tunneling, which is the technology used in tunnelbroker. Note this is different from the 6to4 tunnel that is supported in the native Netgear R7800 firmware — a technology which seems to deprecated, if the repeatedly Google captchas and warnings were any indication.

The Netgear R7800 does not support 6in4 tunneling like the Apple AirPort Extreme, but it appears that its 6rd (IPv6 Rapid Deployment) mode can be used instead with tunnelbroker.net. Since I’m not a network engineer, I’m not 100% clear on why this works, or if there are any limitations to abusing the protocol this way, but it does appear to allow access to IPv6-only servers.

In the Netgear configs, set:

  • Internet connection type — 6rd
  • 6rd Prefix — the Routed /48: value from tunnelbroker
  • 6rd Prefix Length — 48
  • 6rd IPv4 Border Relay AddressServer IPv4 Address from tunnelbroker
  • 6rd IPv4 Address Mask Length — 32

With this “6rd” configuration active on the Netgear R7800, the tunnel appears to work, and I can once again access resources on IPv6 only servers. Not sure if this is fragile or not, but I really only needed a temporary solution. Unfortunately, this also means I cannot access Netflix anymore due to Netflix’s blocking of Hurricane Electric tunnels (as a “VPN”), but that’s another story for another time.

Resolving endless Apple Pay add card loop after Time Machine restore

UPDATE:

There appears to be a new directory at /private/var/db/applepay/Library/NFStorage in later versions of macOS. This directory may have to be cleared as well. YMMV.

Original:

If you recently had your Macbook Pro (Touch Bar) repaired (possibly with a logic board replacement), and restored from Time Machine backup, you might find yourself unable to use Apple Pay on Mac OS 10.12.5. The system will report “Apple Pay is already configured on this disk for another Mac” and ask you to “Reset Apple Pay and Add Card”. If you try to do so by authorizing it using fingerprint or password, it will immediately drop you back to the original “Apple Pay is already configured on this disk for another Mac” prompt, going back into this cycle ad infinitum.

The issue is that there is an Apple Pay cache at /private/var/db/applepay/ on the system that has been invalidated, but it seems to be unable to delete this cache properly. It will keep trying to refresh this cached data, and fail to do so.

There is a workaround for this. Obligatory warning: THIS IS MESSING WITH SYSTEM FILES. DO NOT EXECUTE ANY OF THIS IF YOU ARE NOT SURE WHAT YOU ARE DOING AND DO NOT HAVE A BACKUP OF YOUR DATA. TYPING THE COMMANDS WRONG MAY CAUSE SERIOUS ISSUES WITH YOUR MAC.

I used this process myself to good success under 10.12.5, on my Macbook Pro. YMMV if you decide to try this on any other version of Mac OS.

To fix this endless loop, you need to first clear out all the files (but not the folders) inside /private/var/db/applepay/. Open Terminal.app and enter the following commands:

# get a root shell
sudo -s
# move the stale files away
mv /private/var/db/applepay/Library/Caches/* ~/.Trash/
mv /private/var/db/applepay/Library/Preferences/* ~/.Trash/
# kill the related cache servers
pkill seld; pkill nfcd;

Then:
– Wait a few seconds for the relevant servers to boot themselves up again. Then, go back to System Preferences, hit Add Card…

– It will fail the first time with a mysterious error. That’s fine. Hit Add Card again…

– On this second try, it will say “Apple Pay is already configured on this disk for another Mac”.

– When you hit “Reset Apple Pay and Add Card” for the final time, it will actually break past the loop, and you will get to re-enter your Apple Pay card information without further issue.

It’s a relatively easy fix, so I imagine the next OS version will have addressed this problem in a more elegant way.

Not paying OnTheHub to redownload Windows ISOs

If you’re looking to re-download Microsoft Windows 10 Education edition ISOs and have a valid key from the university licensing program already, grab the education edition ISO images directly from Microsoft instead of paying OnTheHub/Kivuto protection money.

Context

UC Berkeley, like many other universities, has a volume licensing deal with Microsoft for its operating system products. In particular, it offers free downloads of Windows 10 Education edition to all current students.

The irritating thing about this is that they offer this deal through a shady vendor called OnTheHub or Kivuto. Instead of allowing the ability to re-download the ISO image, it holds you hostage if you want to access the image file again after 60 days.

When you first download, it offers you a discounted “extended access guarantee”:

To ensure that your download and/or key(s) remain accessible to you, you can extend your coverage to 24 months with the Extended Access Guarantee for $4.95. With this service, Kivuto will back up your download and/or key(s) on their servers, allowing you to access this information at any time under the “Your Account” section of the WebStore.

If you declined to take advantage of this oh-so-generous offer, and find yourself needing the ISO again after 60 days:

Access Guarantee Retrieval (60 days)
Purchase this service if you wish to recover your download(s) and/or key(s) after access has expired.
You will gain another 60 days of access to any expired product in your order.Learn more
$11.95

In my case, I backed up the wrong ISO — the generic install ISO, instead of the education edition ISO. The product key Kivuto issues you is for the Education edition, so the generic ISO you can get online won’t let you install with the key. It’ll report an error of “The product key entered does not match any of the Windows images” at install time.

So when it came time to reinstall, suddenly I’m faced with the OnTheHub protection racket.

Solution

For Windows 10, at least, you don’t have to pay the protection money. Education edition ISOs are available directly from Microsoft after product key verification. The download page is rather well-hidden, under the “more options” link from the software download page.

Unsurprisingly, OnTheHub makes no mention of this download source.

I wonder how much money OnTheHub makes off people who didn’t realize there was a free, official source for Windows 10 ISO images. Bandwidth costs money, sure, but you are a *education software download vendor* in 2015, with a target market of underpaid students and faculty. Nickel-and-diming poor student users for software downloads, in this era of cloud-driven computing, is an obsolete and despicable business practice.

Building from source package on Debian / Ubuntu to fix sudo PATH issue

So I’ve been kicking around an Ubuntu installation, hoping to replace my aging Fedora 5 deployment. Last time I touched a Debian distro was…well…sufficiently long ago that it’s more or less all new to me.

What’s less new is the sudo path inheritance issue — this one’s been around. Ubuntu’s sudo hard-codes its PATH variable at compile-time with a --secure-path option. I’m sure this sounded like a good idea to the security goon who decided to fix this at fsckin’ COMPILE TIME with no way to override it in sudoers, or at runtime with -E after an env_reset. The policy may have been reasonable when it was set on a typical Debian stable server (where software is basically left to fossilize over decades), but certainly not on a constantly changing desktop distro. You can’t even sudo to any /opt/bin binaries! Read the Ubuntu bug report on sudo not preserving PATH.

Long story short, after a lot of experiments looking for workarounds (that won’t eventually take years off my life, one sudo command at a time), I decided to cut the Gordian knot and recompile sudo. Since I didn’t want to roll this from source (and incur all the maintenance hassle of removing/updating the software later on), this meant figuring out compiling source packages with dpkg — oh joy.

Debian source package compilation: the general process

It’s surprisingly non-painful compared with my RPM experience. The long way around:

  1. cd into a temp or source-keeping directory in your user account
  2. retrieve the source package: apt-get source [packagename]
  3. grab missing build dependencies: sudo apt-get build-dep [packagename]
  4. cd into the directory created for the package in your pwd (you can safely ignore the original tarball and the patch file, which have been untarred and applied for you already, respectively). Make edits to the source as needed.
  5. If you need to change configure options for the source package, look in the file debian/rules in the source directory
  6. when satisfied, build the binary package by issuing this incantation in the $PWD ( you’ll need the fakeroot package if you don’t already have it ):
    dpkg-buildpackage -rfakeroot -uc -b
    Use -nc if you mess up and need to continue a build.
  7. The completed .deb packages are placed in the parent directory, one level up from the source directory. cd back up one level.
  8. install: sudo dpkg -i [packagename].deb

If you’re screwing around with sudo, you will want to have a sudo tty session open before installing your replacement package, in case you screw up everything and lock yourself out.

A shortcut is potentially available using the -b switch to apt-get when you grab from source. However, I needed to look through configuration files and source code, so I took the long way around.

The easiest way to fix the sudo secure_path issue is to remove the --with-secure-path configuration option in debian/rules, in two places in that file. If you do this, pay attention to your $PATH and make sure they are sane (for example: it shouldn’t contain a globally writeable directory), as it will be inherited in sudo shells. In sudo 1.7, there is a runtime secure_path option for the sudoers file, so that would be the ideal, non-annoying solution to this issue.

Hard-coding the sudo PATH at compile-time tilts heavily toward security in the security/usability tradeoff — YMMV, but I find it entirely not worth it on a desktop distribution.

Apple Remote Desktop black screen and old machines

There appears to be some sort of limitation on screen colors when using ARD 3.2.2 to control an older Mac remotely. The symptom of this is a black screen when you attempt to Observe or Control the remote machine. Unfortunately, this same symptom usually appears when you have a blocked network port (ARD uses TCP and UDP ports 3283 and 5900), so it may be confusing as to which is the issue.

After verifying all network settings and router port forwardings are set up correctly, you might try this if you have an older Mac as the target: move the color slider on the top-right corner of your ARD admin panel to a lower value, and then try to reconnect.

The story is that I was trying to remote control a G4 dual 500 ( Mystic ) from a MacBook Pro (early 2008). This used to work until recently, when I had nothing but a black screen. Keyboard commands still worked (I can blindly log in from the loginwindow), though mouse movements did not pass through to the old Mac.

After fruitlessly chasing network issues with my AirPort router, the last post at an Apple Discussions thread pointed me to the right direction. Once I used the color control on the ARD application to lower the color depth by 1 notch, the next connection worked just fine, with the screen showing up and behaving normally.

Now this poor old G4 tower is running 10.4.11 with an ancient Rage 128 Pro graphics card, but it handles its 17inch screen just fine at “million of colors” color depth when sitting in front of it. Very odd how it just stopped working at that depth over ARD.

redhillonrails_core and broken MySQL empty string defaults

While hacking on a side project in Ruby on Rails, I ran across this weird error when trying to insert new data:

ActiveRecord::StatementInvalid: Mysql::Error: Column 'attr2' cannot be null: INSERT INTO `foo` (`attr1`, `attr2`) ... VALUES ('1', NULL)

where attr2 is a varchar (or t.string, in Rails lingo) and set to not null default '' (or, in other words, :null=>false, :default=>''). Strangely enough, instead of the default value of ”, ActiveRecord was setting the value to nil instead, which translates into a NULL. Since the schema explicitly forbids NULLs on that column, the statement explodes.

After an hour of poking around and hacking up a spike solution, it turns out a plugin was to blame. I’d pulled in the foreign_key_migrations plugin (a highly recommended add-on) to automatically install foreign key constraints (in this day and age, the foremost web framework still can’t automatically handle FOREIGN KEY constraints, the most basic tool for ensuring data integrity in relational databases, for its migrations? Bah!).

This plugin has a dependency on redhillonrails_core, which has a known bug: Incorrectly overwrites mysql empty-string default with nil for string/text/binary types.

The bug is apparently not being worked on as of the time of this writing. The dev doesn’t consider this a bug, as he claims that “[he considers] empty strings to be semantically identical to NULL”.

This position, unfortunately, is not supported by the SQL standard. Wikipedia has a section on common SQL NULL mistakes documenting some of the potential problems involved in making such an assumption. Philip Greenspun has further notes on this. Using NULLs trigger the all the arcane annoyances of three-valued logic, and you must be prepared to consider True, False, and NULL values as comparison outcomes. Someone not very versed in three-valued logic can easily cause a number of subtle mistakes trying to compare values.

To workaround this bug, you will need to comment out the initializer function in

vendor/plugins/redhillonrails_core/lib/red_hill_consulting/core/active_record/connection_adapters/mysql_column.rb

Alternatively, you can delete the file, and remove relevant references to it..

If you agree with dev’s position that NULLs are “semantically identical” to empty strings, remember to pay attention when you formulate your SQL queries (and when Rails formulates those queries) — your results may not be what you expect, if implemented naively. Get your three-valued logic truth tables out 🙂

Subversion and undefined symbols

This is fast turning out to be a blog about compiling open source software. Maybe I should change the title.

You may get this error while trying to compile Subversion 1.5.2:
ld: Undefined symbols:
_svn_fs_txn_root_base_revision referenced from libsvn expected to be defined in libsvn
_svn_fs_change_txn_props referenced from libsvn expected to be defined in libsvn
_svn_fs_get_mergeinfo referenced from libsvn expected to be defined in libsvn
_svn_fs_recover referenced from libsvn expected to be defined in libsvn
_svn_fs_upgrade referenced from libsvn expected to be defined in libsvn
_svn_fs_node_origin_rev referenced from libsvn expected to be defined in libsvn
/usr/bin/libtool: internal link edit command failed
make: *** [subversion/libsvn_ra_local/libsvn_ra_local-1.la] Error 1

Turns out there may be a bug in the libtool script shipped with the source tarball, under certain circumstances with OS X 10.4, that causes it to fail to link. Ah, libtool, you make my life so much harder sometimes.

If you copy /usr/bin/glibtool over $SRCDIR/libtool (that is, into the directory for the subversion source code, replacing the one that is placed there by the package itself), the package should compile with no further complaints. make test also shows success on all tests, so this seems a satisfactory solution.

UPDATE 1/31/2009
I’ve been informed in the comments that MacPorts may rely on source compilation from tarball, and thus have this issue. If you’re having this issue with the MacPorts SVN package, please check out the advice in the comment section from farkinga, who has additional notes.

AVCodecContext, Perian, and the Xcode dylib fetish

The Context

So recently I was trying to interact with an avi file with a video stream encoded in H.264 and an audio stream encoded in MP3. To my surprise, my trusty Perian 1.1 failed to even play the video and gave me a black screen (though the audio played just fine). With some Google-fu, it was found in a forum post that the SVN version of Perian fixed this error.

So compile my own Perian 1.1.1b1 from SVN, right? No big deal. Heh. And thus begins our story. (Note that this procedure is accurate as of the time of writing. OSS projects change rapidly as bugfixes are checked in. You may not have this problem at all. But it’s still useful as a reference in the future, in case similar problems arise).

Problem 1: AVCodecContext.bits_per_sample

The first problem you hit is probably:
/tmp/perian-orig/ff_private.c:181: error: ‘struct AVCodecContext’ has no member named ‘bits_per_sample’

/tmp/perian-orig/FFissionCodec/FFissionDecoder.cpp:289: error: ‘struct AVCodecContext’ has no member named ‘bits_per_sample’

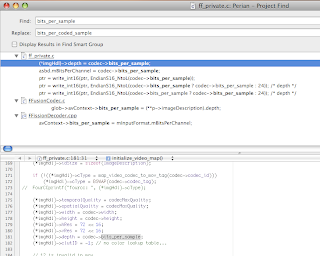
Turns out that the upstream project FFMPEG, who is responsible for libavcodec, has very recently changed the API in one of its latest revisions. bits_per_sample has become
bits_per_coded_sample in revision 15262. Because Perian’s SVN does an external SVN checkout of the HEAD of libavcodec, it pulled these API-breaking changes without considering whether that breaks its own compilation or not.

The fix is simple enough: global search and replace the member variable to bits_per_coded_sample.

Problem 2: Xcode’s unnatural fondness for dynamic libraries

At this point, libavcodec compiles, so you think you’re home free. For most users, that is probably the case. For some of us, though, there’s one more hurdle.

While compiling Perian.component, you might get something like:
ld warning: in /Developer/SDKs/MacOSX10.4u.sdk/usr/local/lib/libavcodec.dylib, file is not of required architecture
Undefined symbols:
"_avcodec_close", referenced from:

…and so on

Closer examination reveals that at some point, you might have compiled FFMPEG or MPlayer or any of the many media projects that depend on FFMPEG libraries (for me, that was transcode, whose own compilation idiosyncracies I documented in an earlier post). When you installed these libraries, they went into your library search path. Note the Perian compilation line immediately preceding the compile failure:
/Developer/usr/bin/g++ ... -read_only_relocs suppress -lavcodec -lavformat -lavutil -lebml -lmatroska ... /tmp/perian/UniversalDetector/build/Release/libuniversaldetector.a -lbz2 -o /tmp/perian/build/Deployment/Perian.component/Contents/MacOS/Perian

As you can see, the -lavcodec linker argument will cause the linker go on the search path and try to find the library. It of course first finds your pre-installed library in /usr/local/lib or some other system lib path, and tries to use it. If you compiled that library as Intel only or PPC only and you tried to build a universal Perian, that would obvious fail and generate an architecture error. If you, like me, compiled only for x86_64 or ppc64, that would also trigger the same architecture problem (as Perian builds as x86 32-bit).

This problem stumped a user “vs”, in this Perian-discuss Google groups thread. Notice how the devs didn’t get the root of the problem, and answered snarkily and defensively to the user bug report.

The devs aren’t wrong, though. Didn’t we just see a statically compiled target, libavcodec.a, in the target list for the Perian Xcode project? Why yes, yes we did! In fact, there are static targets for all of the -lav* libraries in the Xcode project. So why did the linker go off and use -lavcodec rather than, say, $PERIAN_DIR/build/Universal/libavcodec.a, as instructed?

The workaround

In short: Xcode is screwing things up. Xcode 3.1 has a distinct (some say, unnatural) preference for dynamic libraries. When you add a library to the “Link Binary With Library” listing under Targets, it simply adds a -l<libname> to the link line to pass to ld at link time. When this happens, it will look for lib<libname>.dylib (in this case, libavcodec.dylib, libavformat.dylib, libavutil.dylib, etc in your library path. If it finds one, it will use that one rather than the static library you provided in the Xcode project file. Obviously, this ends up linking the wrong library, perhaps with the wrong architecture or the wrong version. Compilation explodes.

The workarounds are not very clean. There seems to be no good way to instruct Xcode to forget its dynamic library fetish and use the static versions you provide. You could remove the dylibs from the system library path entirely — when the linker fails to find the .dylib version, it will fall back to the .a.

Alternatively, you can explicitly instruct it to use static linking as an environment flag and remove the built-in Xcode linker relationships:

  1. Right-click on your Target (in this case, Perian) and Get Info to bring up the Target Info box.
  2. Go to the Build tab
  3. Select your Build configuration – in this case, probably Deployment
  4. Find or locate OTHER_LD_FLAGS, also called “Other Linker Flags”
  5. Manually add the paths to the .a files in this field, one at a time. If you don’t know the path, right-click -> Get Info on the desired libraries under Link Binary With Library, and it should show you a field called Full Path on the General tab. That’s the path to use. Should look something like /tmp/perian/build/Universal/libavcodec.a
  6. Do the same for all offending libraries – this may include libavcodec, libavformat, libavutil, libmatroska, etc.
  7. Remove the libraries you added to Other Linker Flags from your Xcode’s Target -> Target Name -> Link Binary With Library section, to stop Xcode from auto-generating broken linker flags. This is important.

If done correctly, this should no longer find the wrong type of the library. Your compilation of Perian should proceed as normal.

The Moral of the Story

Xcode has some weird idiosyncratic ways of building its projects. It’s useful to poke at things and find out about these behaviors. Its unnatural preference for dynamic libraries over your explicit instructions is disturbing, though.

Don’t attack your users when they pose a problem, and drop the attitude of: ooo, we’re doing this for free, so fsck off, users. In both problems, the exact same attitude surfaced amongst a few of the devs. Arrogance (“we don’t have the responsibility to do anything for you”) and snarky dismissal (‘Well, there’s your problem. We don’t build libavcodec.dylib nor do we place it in /usr/local/lib.’) helps no one. No matter what you thought your build script did, the linker is heading off toward /usr/local/lib, and you better damn well find out why.

It’s obvious that there’s something peculiar going on with the link process, and the user tried to make it clear multiple times (“You missed my point. We build a .a file and we don’t put it in /usr/local/lib.”), but no one seems to pay attention. Following that thread, the user is increasingly frustrated and expresses that, and now the dev’s hammer of arrogance comes down hard ( “You looked like a prick here, to be honest.” — really? not your obtuse-ness or your blindness to a user need?)

When you have a “works-for-me” situation, it’s especially important to communicate effectively with the user. In most cases, you have no idea why it blows up for the user and not for you. Admitting it is fine — could be a very localized issue for that user, or could reveal a subtle systemic problem in your code – either way, it’s useful to have that established. I realize we’re all very busy people, but at the end of the day it’s still your project. Either acknowledge you have no idea what’s going on and solicit help and cooperation with the user who’s having this issue, or man up, put on your detective hat, and fix your own damn problems. The rest of us are busy with our own issues.

The Free Software culture seems to breed this sort of contempt for the user in some devs. Might be a paper in analyzing how corrosive this can be.

UPDATED: I certainly do not mean this last section as a criticism for all Free Software devs. The vast majority of people I’ve talked to in the various communities are really knowledgeable, helpful folks. There are just a few people in some cases, though, who seem to think that if the user can’t make the software work, it’s somehow the user’s fault. It’s a joint problem to be solved together, not “you’re an idiot if you can’t make it work”.

UPDATED 2 (9-29-2008): Perian 1.1.1 has been released. This should fix the original problem with H.264 and .avi files that prompted this post.

Baldur’s Gate 1 graphics glitch and disabling NVidia hardware acceleration

If you have a series 8 NVidia graphics card (say, an 8600M GT) with current drivers (as of the time of this post, of course), you’re likely to see graphics glitches (screenshot 1) in Baldur’s Gate 1. One workaround is to use 16-bit color and software transparent BLT. Another strategy, if your CPU is powerful enough to shoulder some 2D graphics work, is to temporarily turn off hardware acceleration for DirectDraw and avoid the bug entirely. black boxes in Baldur's Gate under Nvidia 2D acceleration

However, disabling hardware acceleration under Vista is apparently easier said than done. Instead of using the Personalization -> Display Settings control panel (as one might think to do based on Windows XP experience), the correct solution is to use the DirectX SDK and dxcpl.exe, the DirectX Control Panel (located within the SDK distribution under Utilities\bin\[cpu_arch]\. From within this control panel, pick DirectDraw on the upper tab bar. Amongst the various configuration options available on that tab, the only one you care about is the box to turn on or turn off hardware acceleration. Turn that off (temporarily, of course) and you’re good to go.

The Context

Baldur’s Gate 1 performs surprisingly well under Windows Vista, despite being a venerable (some might say, ‘ancient’) 10-year old RPG. Unfortunately it’s plagued by a number of graphics glitches when running on NVidia cards. In essence, a number of items and sprites (items on the belt, the timepiece to the lower left corner, birds flying overhead, for example) will be surrounded by black outlines. Further, on your character paper doll in the Inventory screen, giant black boxes obscure much of the figure. In some cases, the ‘fog of war’ on the unexplored regions of a map will be rectangular black boxes, rather than the ‘foggy’ darkness you’re used to. These glitches are widely experienced.

For this very annoying problem, two workarounds are available.

1. Trade color depth for correctness

The prevalent strategy, as noted in a forum post at Spellhold Studios, is to switch on Software Transparent BLT and use 16-bit color depth. This apparently routes around whatever strange bug NVidia managed to introduce in their graphics acceleration layer.

This method works just fine, but was not ideal for me. The game runs at 640 x 480, and is already quite pixelated when scaled up to full screen. 16-bit vs 32-bit color is somewhat noticeable, once at that scale.

2. Trade performance for correctness

Here’s another classic trade-off. Since the problem is obviously arising from the DirectX layer and its interaction with NVidia graphics hardware (boot into safe mode and run BG1 to verify this), another solution is to just kick NVidia out of the loop by disabling hardware acceleration for DirectDraw. This is feasible if you’re doing this on a fast machine (and if you’re using a series-8 card in that box, I’d assume it’s pretty fast anyway) – after all, BG1 is a 10-year old game. Your Core 2 Duo or quad-core Xeon can use some exercise anyway.

Of Hardware Acceleration Controls

In the glory days of XP, this simply meant right-click on Desktop -> Properties -> Settings -> Advanced -> Troubleshoot -> Hardware Acceleration slider (dear god that’s convoluted). In Vista, the analogous experience is right-click on Desktop -> Personalize -> Display Settings -> Advanced Settings -> Troubleshoot -> Change Settings (I see you still haven’t hired a good user experience designer, Microsoft).

The problem now is that if you try this with your NVidia card and Vista, you’ll just be staring at a disabled ‘Change Settings’ button and a terse message: 'Your current display driver does not allow changes to be made to hardware acceleration settings.' If you also try the old standby dxdiag, you might be surprised to know that the Disable buttons have been removed from the DirectX Features box on the Display tab. Thanks, NVidia and Microsoft. Apparently they really don’t want us changing these settings.

But we don’t really want to change much – just the DirectX technologies, and in fact, just the 2D-based DirectDraw (since 3D is more or less irrelevant for BG1), and only for a short while. Enter the DirectX SDK.

The SDK is meant for developing and debugging DirectX-based programs, but it comes with a fair suite of nifty utilities, one of which being the DirectX Control Panel: dxcpl.exe. Download the 400+ MB SDK (this is the 2008 version of the SDK — you might look for a newer version if you’re on Win 7; I think the control panel still ships with the latest versions) and grab the control panel in Utilities\bin (starting from where you installed the SDK to). Make sure that if you are on x64 (x86_64) that you also use the x86 architecture control panel for BG1, as it seems to be required to affect 32-bit mode apps (see comments for this post for more details).

In the control panel, use the DirectDraw tab – in the set of checkboxes, uncheck the “Use Hardware Acceleration” box. Fire up BG1 and see the non-black-boxed goodness of 1998 graphics (screenshot 2).
Baldur's Gate playing normally after disabling Nvidia-accelerated DirectDraw
If you were disabling acceleration for another reason, this control panel should work for you too – pick the appropriate tab and have at it. Do not forget to turn acceleration back on after the session. You probably do not want unaccelerated graphics performance in your normal, non-glitchy apps.

Turning off hardware accelerated DirectDraw avoids the BG1 black-box bug. You’ll have to assess for yourself which is more expendable: color depth (trivial to change directly from BG1’s Options configuration) or graphics performance (more difficult to tweak, but perhaps compensated by CPU performance).

DirectX SDK vs Settings slider

In any case, the DirectX control panel is a somewhat useful trick to know in general, especially when faced with Vista’s obstinate insistence on not letting you change graphics acceleration settings. The control panel provides all the functionality that the old XP Settings slider would have give you – except in a much more technical interface. In fact, the old slider more or less tweaked settings in the Direct3D and DirectDraw tabs, except in a coarse-grained, all-or-nothing kind of way. Here at least you have fine-grained control on most of the detailed options in each panel.

Still, such a pain.

Know that tweaking these settings are done at your own risk (NVidia and MS obviously are against it), and may or may not work at all depending on your setup, your driver version, and pure luck. On the plus side, if you ever need to write some DirectX apps, the SDK is now just a few clicks and SDK path text fields away from Visual Studio 2005/2008, so the 400 MB bandwidth and disk space isn’t completely wasted. Hopefully.

UPDATE 9/8/2008
It’s come to my attention that some people still have problems after applying this fix – namely, there are cursor trails on menu screens. I cannot reproduce this issue locally on my 8600M GT, but it’s possible that there are new problems introduced with newer series-8 cards and drivers. If this is the case, I’d recommend using the first workaround — that is, using Software BLT and 16-bit color, rather than the DirectDraw workaround.

UPDATE 7/15/2009
There is now a Nvidia driver .dll patcher available for BG1-era Infinity Engine games at Spellhold Studios. They also explain what the underlying issue is and what the DLL wrapper does to work around the bug. I have not personally tested this fix. It does install a new graphics DLL that overrides existing calls, so it is theoretically possible that it may introduce other issues, but I am told by others that it works quite well. Check it out — it saves you a lot of trouble of ticking DirectDraw boxes on and off, if you don’t mind unofficial DLL patching.

UPDATE 2015
There are still people arriving at this page, 7 years later after the initial post. At this point, you should probably just buy the remastered Baldur’s Gate Enhanced Edition on Steam instead. Much, much less hassle.