macOS Safari displays blank page when accessing flask development server on localhost:5000

There is a very strange behavior in macOS Ventura 13.1 (and possibly earlier macOS as well), where the macOS Safari browser and the Google Chrome browser cannot access a Python Flask web development server on port 5000. The URL http://localhost:5000 either shows as completely blank, or responds with a 403 Forbidden.

Context

In short, Flask is a lightweight web application framework for Python. A typical Flask webapp is run in development mode as

flask --debug run

By default, this will start a Flask development server on port 5000:

* Debug mode: on
WARNING: This is a development server. Do not use it in a production deployment. Use a production WSGI server instead.
* Running on http://127.0.0.1:5000
Press CTRL+C to quit

From the command line, subsequently, curl can be used to reach the server

curl "http://localhost:5000/"

In my case, it responds with

Hello world

Note that localhost and 127.0.0.1 are, in typical cases, equivalent to each other. Both of them are pointing to the local machine.

Problem

If using the Safari browser on the same machine, though, and hitting http://localhost:5000, this will display a completely blank page. The development server itself will not show that a GET request was made, which suggests that the request never made it to the flask application at all.

If using the Chrome browser to hit http://localhost:5000, it will display a 403 Forbidden error instead of a blank page:

Access to localhost was denied
You don't have authorization to view this page.
HTTP ERROR 403

And again, the Flask dev server itself does not show a successful GET request being made.

As a final symptom, if instead http://127.0.0.1:5000 was used, a GET will be successfully received by the Flask dev server, and the server will respond to it normally.

Solution

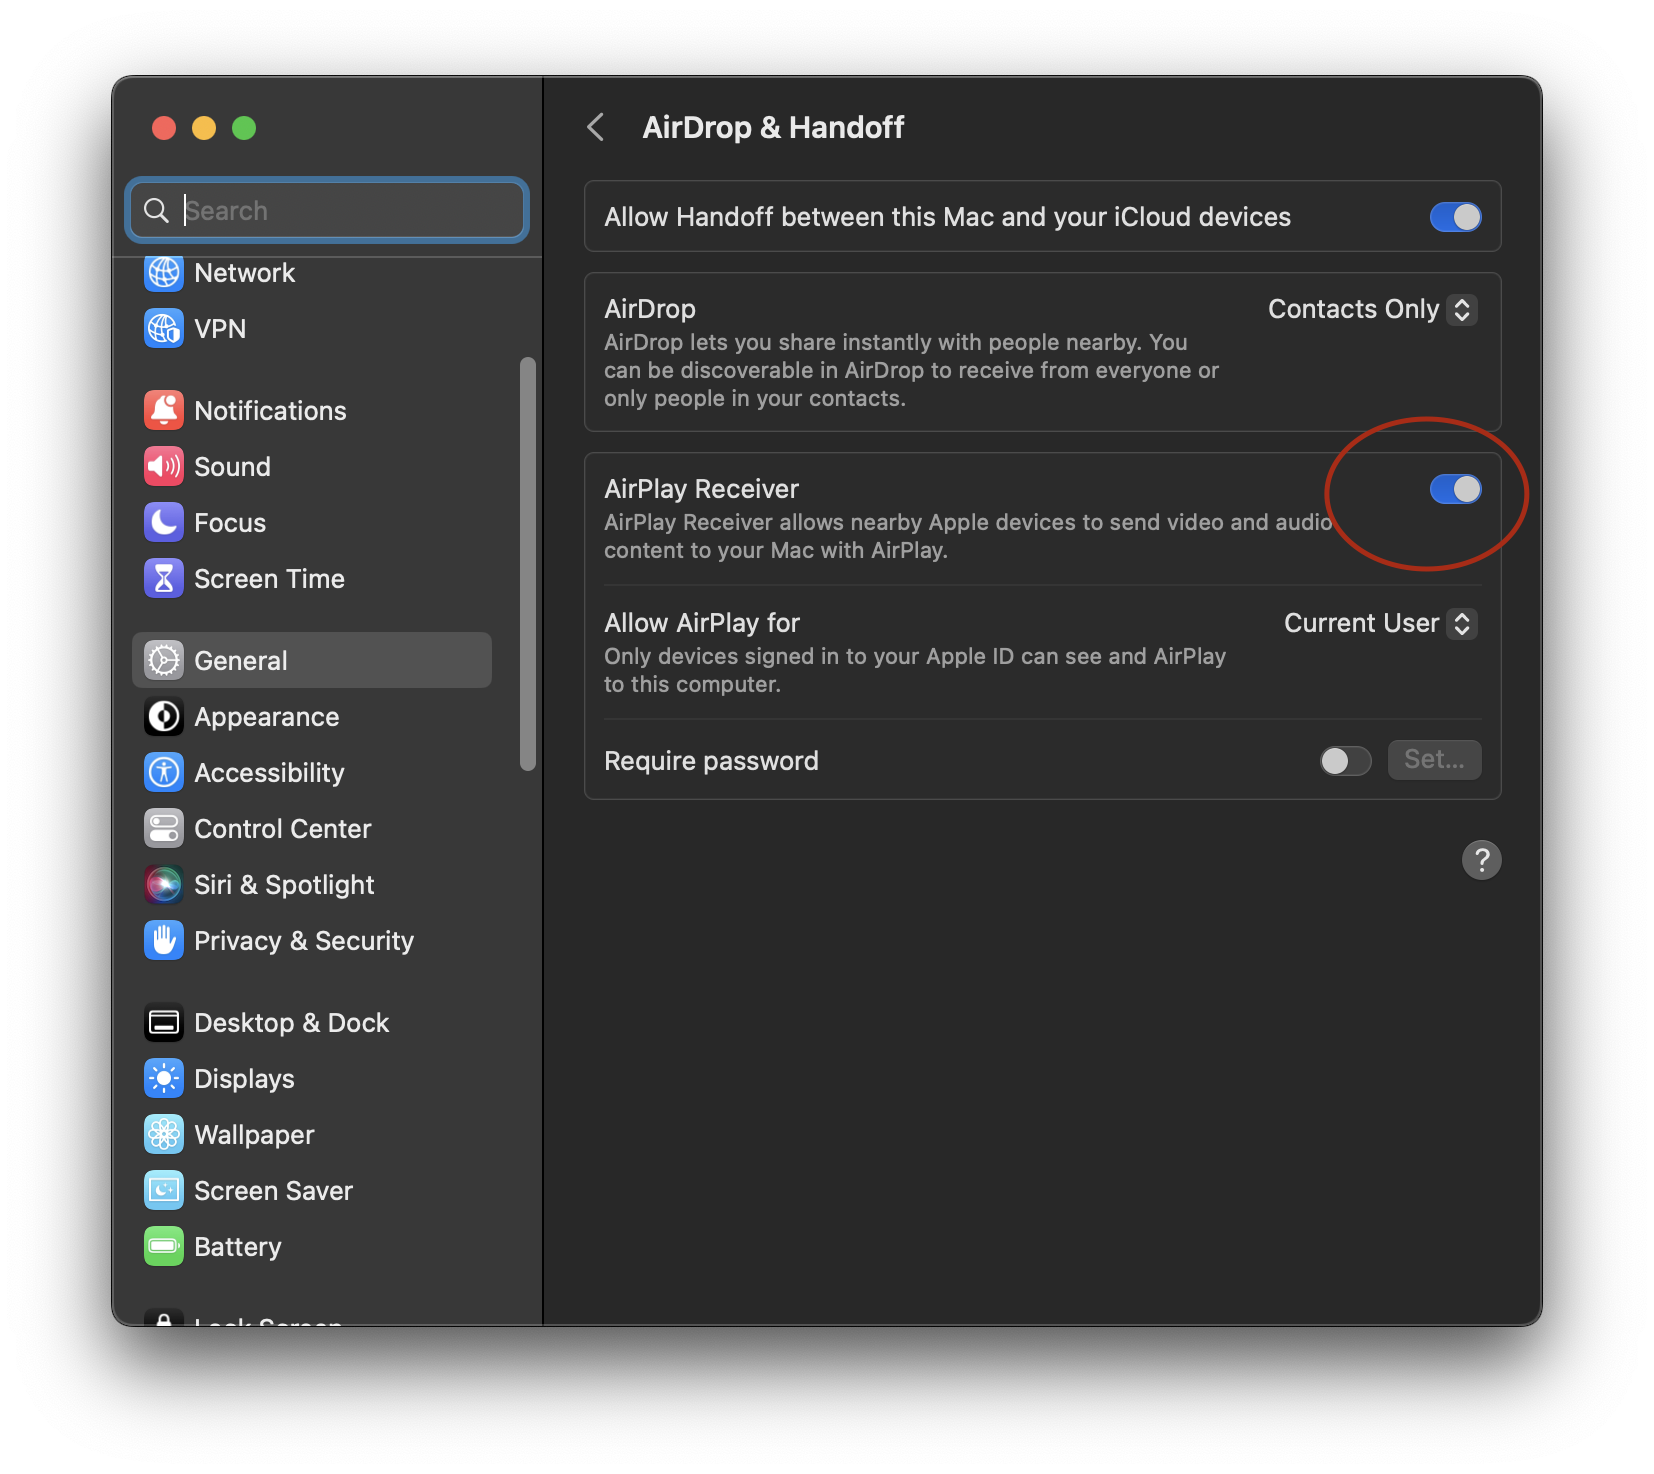
  1. On macOS Ventura, go to Settings -> General -> AirDrop & Handoff and turn off AirPlay Receiver.
  2. Alternatively, instruct Flask to use a different port for its dev server other than 5000 and access that port instead:
    flask --debug run -p 8000
  3. Alternatively, always interact with Flask on the IP literal 127.0.0.1:5000 rather than the localhost DNS name. This is what the Flask instructions say to do anyway.

Discussion

It turns out there is a port conflict, of sorts. On macOS Ventura (and possibly Monterey as well), the OS’s built-in AirPlay Receiver is also listening on TCP port 5000 for some purpose. Running

lsof -i -P

...
ControlCe  423 yliu    7u  IPv4       0t0  TCP *:5000 (LISTEN)
ControlCe  423 yliu    8u  IPv6       0t0  TCP *:5000 (LISTEN)
...
Python    1374 yliu    5u  IPv4       0t0  TCP localhost:5000 (LISTEN)

we can see that ControlCenter (really AirPlay Receiver) is listening on TCP *:5000 and the Python Flask app is listening on localhost:5000.

In fact, if the Flask server is turned off, and a curl -i command (to show response headers) is issued to localhost:5000, this is the response:
curl -i "http://localhost:5000/"

HTTP/1.1 404 Not Found
Content-Length: 0
Server: AirTunes/670.6.2

I’m not sure why this situation isn’t causing a port conflict, throwing a socket error for “address already in use”, which would block the Python app from starting at all. Similarly, I don’t understand why it doesn’t affect curl when run on the command line, which still successfully reaches the Flask server.

Nevertheless, changing Flask’s socket to an unoccupied port such as 8000, or turning off the offending macOS component AirPlay Receiver that is using the port, addresses the conflict. Now both Safari and Chrome will be able send requests to the actual Flask server, rather than the AirTunes server also residing on port 5000.

fixing a scrambled IPython command history on stock OS X 10.6

So I started over with a fresh install of OS X 10.6 recently, and wanted to restore my Python development environment. In doing so, IPython is absolutely essential if you want a sane interpreter environment to test out code. I had a bit of trouble with it though.

The Problem

The stock Python 2.6 shipped with OS X 10.6 Snow Leopard has a readline module linked to libedit, the BSD alternative to the GPL’ed readline. The readline module, if you are not aware, is (among other things) responsible for keeping command history in the IPython interpreter. This causes command history in the IPython 0.10 interpreter to behave in very odd ways. When backtracking through the command history buffer using the up-arrow key, for example, the previous command is only partially recalled, and appears completely scrambled. Indents, too, seem off — in a whitespace-sensitive language like Python, this is annoying. (See first figure)

IPython command interpreter is broken when using libedit with command history

Fixing IPython’s bugs are beyond my ability. While I certainly don’t want to delve into the quagmire that is GPL vs BSD licensing, I do understand why Apple would want to avoid the viral nature of the GPL and ship libedit instead. However, using a genuine Readline library is going to be the best recourse for this problem. I already have a copy of readline compiled and ready to go, and just need a new version of readline.so, the library that links Python to readline.

The easy solution

Sifting through my records, I came across a SelfSolved problem record from my good friend Hannes who had issues with his IPython command history.

The solution: sudo easy_install readline, which uses setuptools to install a precompiled package of readline.so statically linked to genuine GNU readline. Restart your IPython console and everything should work. (See second figure)

IPython with readline

The hard solution

Being the inquisitive sort, I also wondered how I would be able to reproduce this work from scratch. readline.so ships with the Python source package, but surely I would not be required to compile a whole new copy of Python for one measly module library?

I documented this process in SelfSolved again: building readline.so for Python. At some point I should write an interface between SelfSolved and WordPress so that I don’t have to reproduce a lot of my work here manually.

Compiling readline.so

This is actually fairly easy.

  1. Get a copy of the Python source code. In OS X 10.6, it ships with Python 2.6.1.
  2. Unpack it and go into its directory. You should find a Modules subdirectory. In it is readline.c, the source file for readline.so.
  3. Compile the source file. The appropriate incantation is:
    gcc -O2 -arch x86_64 -arch i386 -shared -o readline.so readline.c -I/usr/local/include -I/System/Library/Frameworks/Python.framework/Versions/2.6/include/python2.6 -L/usr/local/lib -lreadline -ltermcap -framework Python

    where the -arch flags should be whatever processors you wish to support, the -I arguments should point to the directories that contain header files for the readline library and the Python framework, and the -L argument should point to the path for the readline library. Use whatever optimization flags you feel comfortable with, instead of -O2, if you wish.

Replacing readline.so

So now we have a readline.so that’s properly linked to readline.dylib. The thornier question is how to override the system-provided readline.so. The system version is located at /System/Library/Frameworks/Python.framework/Versions/2.6/lib/python2.6/lib-dynload/readline.so, and the naive would simply overwrite it with their new readline.so. This is a bad idea.

As I have mentioned in the past, overwriting system libraries in OS X is an unhealthy thing to do. The problem is that Apple furnishes no official package management system — anything you personally change is considered fair game for the next official system update. On the next system update, if the Python component is affected by the update, the Apple updater will happily clobber your compiled files with its own, leaving you suddenly back at square one. You don’t know how many times I’ve had to recompile emacs (for X11 support) on OS X 10.4 because of this little annoyance. Leave things in the /System/Library directory hierarchy alone, for your own sanity.

However, in this case /System/Library/Frameworks/Python.framework/Versions/2.6/lib/python2.6/lib-dynload comes ahead of the user-modifiable /Library/Python/2.6/site-packages directory on Python’s sys.path. So if you just drop readline.so into site-packages, the system version still takes priority.

There are a few ways to do this. For one, you can create a sitecustomize.py in /Library/Python2.6/site-packages. In this file, arbitrary Python statements can be written, and the interpreter will automatically execute them at runtime. So, you can add a sys.path = ["/dir/here"] + sys.path statement and point it to a directory containing your readline.so file. Alternatively, you can abuse the technique used in the easy_install.pth file. It turns out that if you ever used easy_install, directories pointed to by the easy_install.pth file takes priority over the system paths. They use an interesting way to accomplish this, which you can copy. Or, you can just insert your directory containing readline.so into easy_install.pth. In any case, this will force the readline-based readline.so to take precedence over the libedit-based readline.so, without overwriting anything.

Discussion

So for any sane person, the easy solution should be enough. For the rest, the hard solution is an interesting exploration of how some of Python’s built-in modules can be compiled and inserted individually.

A NAT-PMP client library for Python

Something that I’ve put together and might be somewhat useful to others. I wrote a NAT-PMP (Network Address Translation Port Mapping Protocol) library and testing client in Python. The client allows you to set up dynamic port mappings on NAT-PMP compatible routers. Thus this is a means for dynamic NAT traversal with routers that talk NAT-PMP. In practical terms, this is basically limited to the newer Apple AirPort base stations and the AirPort Express, which have support for this protocol. I’m currently unable to support UPnP (the dominant port mapping protocol in non-Apple routers), though I’m sure either someone has written bindings for Python, or I’ll have to do it eventually once my AirPort Express dies.

In any case, this library puts a thin layer of Python abstraction over the NAT-PMP protocol, version 0, as specified by the NAT-PMP draft standard.  The purpose of this is simple.  I needed to establish port forwarding without rebooting my AirPort router.

Normally, when you need to have a public port on your router forwarded to a private port on your box behind it (say, if you write a server that listens on a port, or have a P2P client running on a port) you’d have to fire up AirPort Utility.app -> Advanced -> Port Mappings, set your mappings, and then hit Update…which reboots the router, killing your network connection and anything you might be doing. There has been no good way to do this programmatically with AirPort routers, when your program needs to negotiate a port forwarding with no manual intervention. Further, there isn’t a command-line tool to open up a port when you’re SSH’ed into your machine but don’t have a GUI.

Creating the port mappings dynamically via NAT-PMP allows port forwarding to happen without the reboot. When my server runs, it can make a call to the router to start forwarding a port.  Furthermore, when I’m done with testing my server, I stop renewing the port mapping, and it expires when its lifetime runs out.  Thus, I won’t forget to delete the mapping later (and reboot the router yet again) when I want that port secured behind the NAT.

Files

py-natpmp repository on Github. If you want the unpackaged source code, you can find the latest versions there.

py-natpmp-0.2.1.tar.gz – a proper Python setuptools package for py-natpmp, if you’re rather take a tarball.

(To enable NAT-PMP on the AirPort router, go to AirPort Utility.app -> Internet -> NAT -> Enable NAT Port Mapping Protocol. Requires Mac OS X 10.4 to succeed. Older AirPort utility software may have this option hidden elsewhere.)

The code is BSD licensed, so feel free to take it. I’d love knowing where this code ends up (just out of personal curiosity), if you drop me a line, but that’s quite optional.

Client

To use the client, grab it and the above library. Make sure you have the library in the same directory as the client script or otherwise on your Python instance’s sys.path. Invoke the client on the command-line (Terminal.app) as python natpmp-client.py [-u] [-l lifetime] [-g gateway_addr] public_port private_port.

For example:

python natpmp-client.py -u -l 1800 60009 60009
Create a mapping for the public UDP port 60009 to the private UDP port 60009 for 1,800 seconds (30 minutes)
python natpmp-client.py 60010 60010
Create a mapping for the public TCP port 60010 to the private TCP port 60010
python natpmp-client.py -g 10.0.1.1 60011 60022
Explicitly instruct the gateway router 10.0.1.1 to create the TCP mapping from 60010 to 60022

Remember to turn off your firewall for those ports that you map.

Library

The library provides a set of high-level and low-level functions to interact via the NAT-PMP protocol. The functions map_port and get_public_address provide the two high-level functions offered by NAT-PMP. Responses are stored as Python objects.

The code is fairly well-documented, so consult the NATPMP.py file for usage details.

Disclaimer

This is an incomplete implementation of the specification.  When the router reboots, all dynamic mappings are lost.  The specification provides for notification packets to be sent by the router to each client when this happens.  There is no support in this library and client to monitor for such notifications, nor does it implement a daemon process to do so.  The specification recommends queuing requests – that is, all NAT-PMP interactions should happen serially.  This simple library does not queue requests – if you abuse it with multithreading, it will send those requests in parallel and possibly overwhelm the router.

The library will attempt to auto-detect your NAT gateway. This is done via a popen to netstat on BSDs/Darwin and ip on Linux. This is likely to fail miserably, depending on how standard the output is. In the library, a keyword argument is provided to override the default and specify your own gateway address. In the client, use the -g switch to manually specify your gateway.

Conclusion

This is a relatively simple library that I am using in aiding my development work, and provides for port forwarding and NAT traversal in my personal Python apps.  It may also come in handy for you in your Python code — if nothing else, as a reference to see how to interact with the router via the protocol. It is not elegant/well tested, and not meant for daily use by a normal user.  If you use the library in your code and it does not work for your configuration, I would be happy to take bug reports (or even better, patches!).

The client is intended for demonstration purposes only, though I personally use it as a command-line sysadmin tool for when I’m away from my machine but need to open up a port.

If you are a typical user looking for port forwarding tools, this is not for you. For an actual, well-designed, user-friendly program to perform dynamic port mappings on the Mac, try the great shareware package Lighthouse, which provides a user-friendly menu bar extra, persistent port mapping profiles, and UPnP support for your non-Apple routers.

Updated Feb 10, 2010
– Repackaged with setuptools. Fixed major bugs on systems that fail to detect the gateway automatically. Experimental Windows 7 support.
Updated Feb 05, 2008
– Removed broken mutexes, pending work to implement a decent request queue. Allow me to reiterate that this library is currently non-compliant with the specification’s recommendation to queue NAT-PMP requests. Try not to abuse your router when using this library in multithreaded Python code.
– Added some gateway autodetection on NT systems via netstat. Thanks to roee shlomo for the regex.

Again, comments and patches (or better thought-out implementations) are welcomed and encouraged.

Exchanging objects between PHP and Python

So over the course of my various projects, personal or otherwise, I’ve collected an assortment of information that may or may not be of interest to others or to myself in the future. What does end up happening is that I would make notes about it in a file or (dear god) on a random piece of paper, post a message to some forum or mailing list, or just plain put it in that lossy storage medium of my own mind…and then promptly forget all about it. For a would-be information specialist, this ironic lack of information organization has caused many problems and continues to do so, especially at retrieval time.

Now in 2007, as New Year’s Day draws to a close, I am putting my laziness to the test again by resolving to begin this project to document Random Things That I Somehow Know About. Some of this is trivial, some of this is not. But for one reason or another, I intend to keep track of it.

Starting with something recent. To workaround a problem when deploying a Python-based service on a server that disallowed Python CGI execution, the Python driver program had to be wrapped around a PHP frontend (which the server did allow). However, the driver needed to accept a number of parameters, and the PHP wrapping must conveniently pass these parameters via a call to system() and print the resulting output from the Python driver to stdout. In a previous, similar project, I engineered a set of subroutines in the Python driver to parse options on the command line, and had the PHP script put those options on the commandline at invocation time. It was tedious, error-prone, and remarkably insecure, even with Python variants on getopt() to help

Since this was a proof-of-concept project in any case, there had to be a faster, friendlier hack. It would be great if the wrapper and the driver could exchange data objects directly – in this case, PHP associative arrays and Python dicts. Then the Python driver can simply ask for the necessary values bound to fixed options/keys.

Enter Armin Ronacher’s phpserialize.py, conveniently under BSD license. It exposes two functions, serialize()and unserialize(), which encodes and decodes data created by PHP’s own serialize() function.

The solution comes together as follows. On the PHP side:

//something to ensure that we've got a correct parameter object
$params = array('phpArgs' => 'yes'); 
$params['foo'] = 'bar'; //check and populate $params
$s = serialize($params);
//so that if we're passing on cmdline
//things don't blow up if weird bytes encountered
$s = base64_encode($s);
//...and so on

Once the $s in base64 text is passed to the driver script, the Python side will simply call this:

def getParameters(php_base64_str):
    php_parameters = base64.decodestring(php_base64_str)
    parameters = unserialize(php_parameters)
    return parameters


and parameters will be a Python dictionary with all the values in place, mapped to their original keys.

>>> params = getParameters(s) # retrieve s from argv first
>>> params['foo']
'bar'

This makes exchanging data between frontend and backend a lot less headache inducing.